Blog
Eight Production Tips for Mixing Kick and Bass
2 Jul '2021
Learn why your bassline and kick drum can be the hardest parts of music production to master with this mixing guide.

Kick and bass are often said to be the hardest parts to get right when it comes to mixing – and indeed, any aspect of music production at all. Your kick must be punchy, solid, and low; while your bass needs to be strong, heavy, and…also low. But mixing is all about giving each element its own space in the mix, meaning that it’s the similarity between the kick drum and bassline that makes them less likely to coexist peacefully.
But hope is in sight for getting your mix’s kick and bass to become better bedfellows, and we’ll tell you how to get them working harmoniously together with the following tips: EQ sidechaining, retiming, and tuning are just a few of the ways to get it right in your DAW.
Perhaps not all these tips will apply to your particular situation. Your production problems are as unique as your tracks themselves, and so these techniques are simply suggestions to help you solve what ails your particular low end.
To read the theory behind why kick and bass sounds are so hard to deal with, check out The Trouble with Kick & Bass, also on the blog.
1. Choose the Right Sounds to Begin With
A lot of our tips in this article will be about getting an unruly kick and bass combination to work together, but there’s actually a way to ensure that it’s easy to do that – just choose a better combination of sounds from the start!
By spending a little more time auditioning both your kick and bass patches, and seeing how different combinations sound together, you might make a lot less work for yourself down the line.
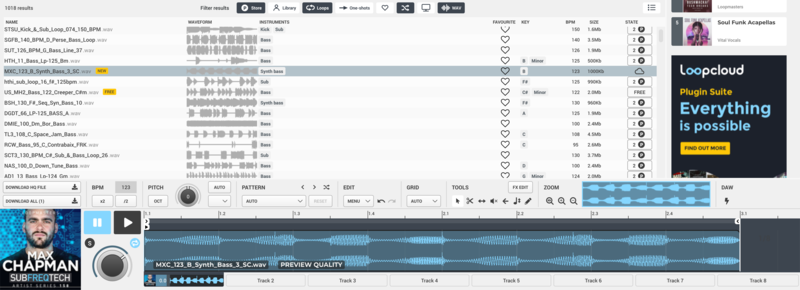
Our Loopcloud software lets you audition millions of sounds right from the comfort of your DAW, synced perfectly to your project thanks to the free Loopcloud plugin. By searching sounds using genre, instrument, tempo and more, you can hone in on the perfect combination, and thanks to auto sequencing, you can audition both one-shots and loops for your kick and your bass sounds.
Choosing the right sounds will help, but it’s not a cure-all for every situation – the chances are, you’ll need to do a little bit of mixing to fit your chosen kick and bass sounds together. But what should you even be looking for when auditioning your kick and bass sounds to make them more mixable? The rest of our tips will help you understand…
2. Retune the Kick or the Bass
So the problem with kick and bass – as described in our guide to The Trouble with Kick & Bass – is that the two conflict by sharing the same region of the frequency spectrum. When two sounds play right on top of each other – ie, on the same note – they tend to mask each other, each being harder to hear.
In contrast, if we play two tones on different notes, each will be more audible – it’s just common mixing sense. Imagine other elements of your mix all happening using the same octave of notes, and you can imagine the muddy, incoherent mess you would get. Frequencies masking each other is a broad subject and is a big theme in production.
There are a lot of strategies for dealing with two instruments clashing in frequency, but one great way to do it is to take control of their pitches – that’s right, literally tune them.
You may have a kick playing at a certain frequency, and the notes of your bassline are doing something different, but slightly similar. Check your audio out on a spectrum analyzer if you’re not sure exactly where on the frequency spectrum each is doing its thing.
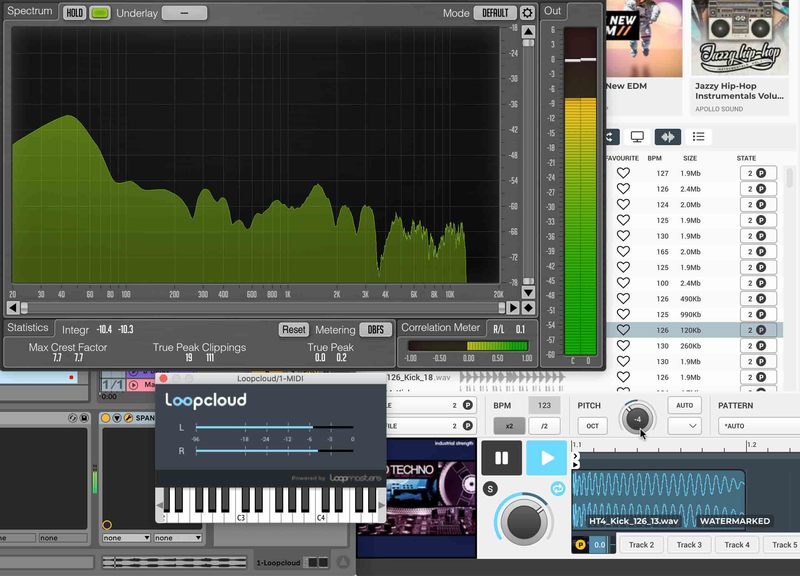
By analyzing what notes each element is hitting, you can tune one or the other to move it out of the way. This may be as simple as tuning a kick in a sampler (or in Loopcloud, as shown above), or restructuring all the notes of a bassline to make it work with your perfect kick.
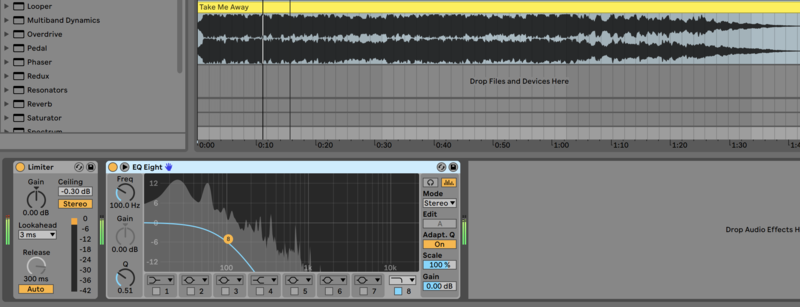
3. EQ to Make Space
If tuning is one obvious way to make two sounds distinguishable, EQ is another clear strategy. Your bassline might have some energy at the frequencies where your kick lives, and you might wish to turn those frequencies down in order to make room for that kick.
Using your EQ’s spectrum analyzer or a separate analyzer plugin, you can find out where the energy of your kick lies. Using this knowledge, you can notch out that particular frequency on your bassline.
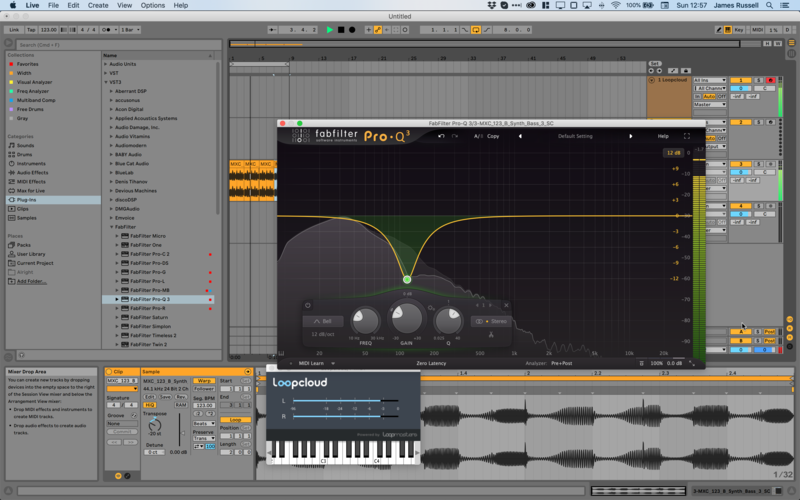
This strategy isn’t a solution for every kick and bass mixing worry – you can easily damage what was great about the instrument you’re EQing in order to fit the other one in on top of it. Also, it’s entirely possible to over-EQ and mess with the phase coherence of a sound. If that sounds like a PhD thesis to you, just remember: use your ears and trust them.
4. Listen and Feel
Bass isn’t so hard to wrap your head around. As we explained in our Trouble with Kick & Bass article, our hearing system is a lot better at listening to midrange sounds, as they’re what we hear all day, every day. A low-down Reese bass identifier in the brain wasn’t necessarily going to save early humans from tiger attacks (although you never know).
To get more of a handle on your bass tones, our first tip is to occasionally listen to your music through a low-pass filter placed on your master channel. By setting the cutoff to about 120Hz, you can hear just the bass end of the spectrum, and you’ll have more chance for critical listening to your mix’s low end.
Another great way to get a handle on how your bass elements are interacting is to literally touch your fingers to your speaker cone. Getting this little extra physical connection with the bass tones – which naturally transmit through solid matter better than higher frequencies do – is a great way to keep an eye on [or is that a finger on] your bass and sub bass elements and how they present together.
5. Reference with Commercial Tracks
Not just advice for kick and bass mixing, but a clever thing to do when working on any stage of music production, referencing your mix against commercial tracks is a great way to ensure that your tunes stack up against the competition and those of artists you respect.
A referencing technique specific to kick and bass parts would be to listen through a low-pass filter (as described in our previous tip) to both your own work in progress and a track with a similar sonic profile to what you’re aiming for.
Remember, your track – both its low end and its whole frequency spectrum – won’t be exactly comparable to a commercial tune: your track is being written, arranged or mixed, while your commercial rival has been mastered. For a fair comparison, turn the commercial track down and keep in mind that it will have a lower dynamic range than your work in progress.
Dedicated plugins such as Mastering The Mix Reference or MeldaProduction MCompare can help you reference tracks easily, switching between them with the touch of a button and working across different sessions too.
6. Retiming Kick and Bass
This tip won’t always work with your particular kick and bass sounds, but it’s worth a try, as getting this right means you don’t need to do much else to get your kick and bass sounds distinguishable from each other.
This trick is best performed with your bassline rendered to audio, but MIDI is sufficient if you’re not ready to render. Simply zoom right into the waveforms with your kick and bass on tracks next to each other, and move the bassline later in time very slightly so that plays a little later than your kick.
As we mentioned, this strategy won’t work every single time, but if your particular combination of kick and bass lend themselves to doing it this way, and the bassline doesn’t sound off, it’s a great way to help your kick and bass sounds sit together well in your mix.
7. Sidechain Compression
Originally designed to ‘duck’ music into the background in order to make a voice more audible over the top, sidechain compression has come on in leaps and bounds since it was first used. It’s also responsible for the ubiquitous sounds of ‘mix buss pumping’ made famous by artists like Eric Prydz and Daft Punk. But there’s a third use for sidechain compression.
By using a compressor over your bassline and triggering it from your kick instead of from its own audio, you can create a sidechain compression effect where the bass gets knocked down whenever the kick plays. This won’t actually be noticed as a gap in the bassline itself, but will result in a more defined sound for both, with the ability to made both louder than before.
To get it right in your DAW, set a compressor on your bass track, and use the kick’s channel as its sidechain input. Reduce the Threshold to a point where the kick is triggering gain reduction of the bassline, and customize the Ratio and Threshold to your liking.
Set quick Attack and Release times so that the effect isn’t noticeable in the bassline itself, but things still get muddier and less clear when the compressor is bypassed – it’s a subtle effect.
8. Dynamic EQ
We’ve discussed both EQ and sidechain compression tactics here, so why not come up with a combination of both? Can we set up a band of a dynamic EQ so that a single band of frequencies responds to the kick, instead of the whole bass signal? As it turns out, yes we can.
While the usual sidechain compression technique ducks all of a bassline when the kick plays, using a dynamic EQ plugin we can make it duck only the very low, bassiest band of a bass signal when the kick plays. With the kick being low-down on the frequency spectrum itself, that’s plenty of dynamic ducking.
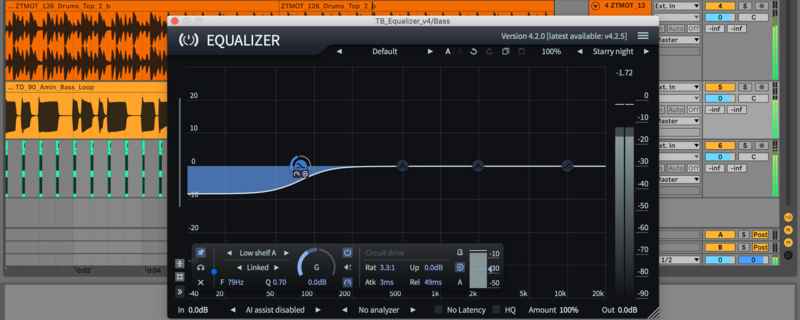
Above, we’ve set up the effect using ToneBoosters Equalizer 4, dialing in a low shelf band that makes no change to the gain as standard, but has its dynamic setting set just like a compressor, giving us response when the kick plays. It’s also possible to do this in the same way using a multiband compressor – instead of ducking a band of EQ, you’re banding off a dynamic process.