Blog
Mastering Mainstage in FL Studio: A Comprehensive Guide with Loopcloud Sounds
5 Mar '2024
Enhance FL Studio’s efficient EDM workflow further by adding the slick new Loopcloud Sounds VST into the mix

FL Studio is known for being a DAW in which you can quickly whip up beats on the fly, partly due to its unique channel rack and sample manipulation features. This efficiency is only enhanced when you add Loopcloud Sounds into the equation, which makes it a doddle to source sounds and audition them within your track.
For Mainstage EDM producers like the acclaimed Martin Garrix, sound selection is one of the most important parts of producing a track. Although a sample in a Mainstage track might undergo a lot of manipulation, you can bet that it was chosen by the producer initially because it had an attractive quality or character. In this article we’ll show you how the combination of FL Studio and Loopcloud Sounds makes it easy to hone in on those traits and find the sounds you need.
Loopcloud Sounds is a nifty tool that brings the sample discovery and auditioning power of the Loopcloud desktop app into your DAW. Search Loopcloud’s expansive catalog of loops and one-shot samples internally from the plugin within your DAW to instantly find in-key samples at the right tempo. Or, get creative and manipulate the samples as you see fit.
Loopcloud Sounds is available to anyone with a Loopcloud subscription. You can try it free with a 14-Day Trial.
Step 1: Finding some catchy chords
With a Mainstage track, most of the magic lies within the catchy harmony between the chords and melody, so we’ll start there. Let’s try to find an uplifting chord progression loop within the Loopcloud Sounds library.
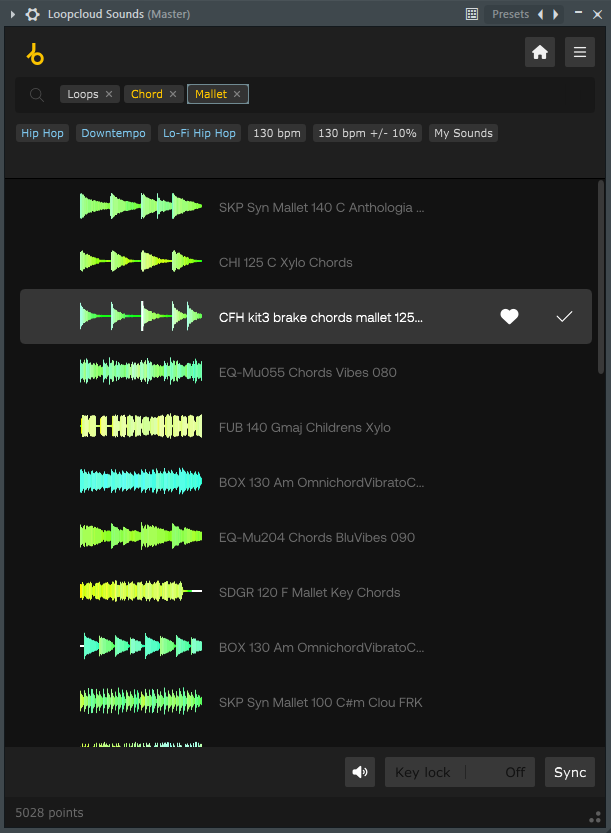
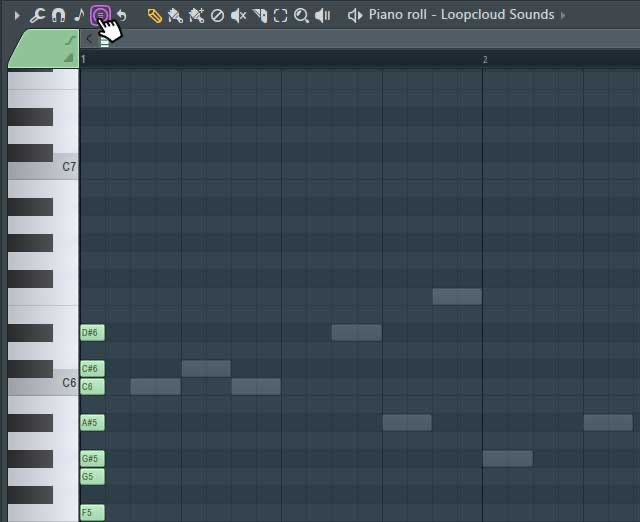
First, open up an instance of Loopcloud Sounds on your Channel Rack and search for a fitting chord loop. You can audition samples from within the browser by clicking the Play button in the left-hand side column.
Once you’ve found a suitable loop to work with, you can add it to your favourites by clicking the heart-shaped button and purchase it with your Loopcloud credits by clicking the ‘+’ button. We’ve gone with a 125bpm mallet chord progression in the key of F Minor.
Now that we have a starting point, we can set our project tempo to match our sample (125bpm) and drag the loop straight into FL Studio’s Playlist (arrangement) window.
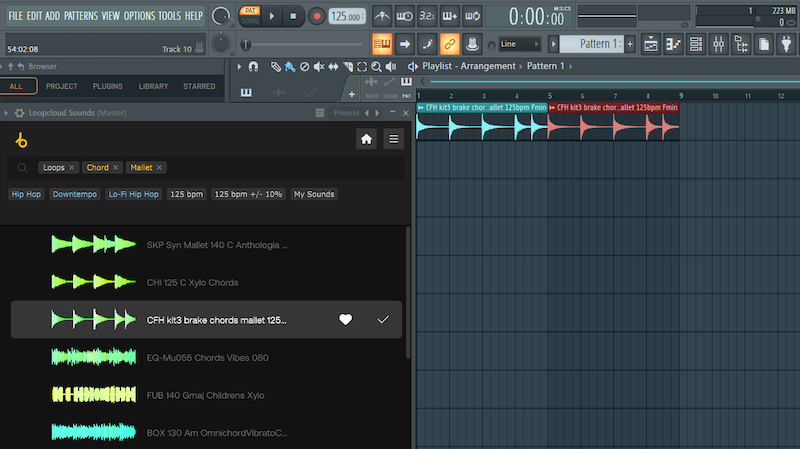
Because this loop is only four bars long, we’ve duplicated it to make it span across eight bars. This will allow us to create a bit more diversity when adding our melody and percussion.
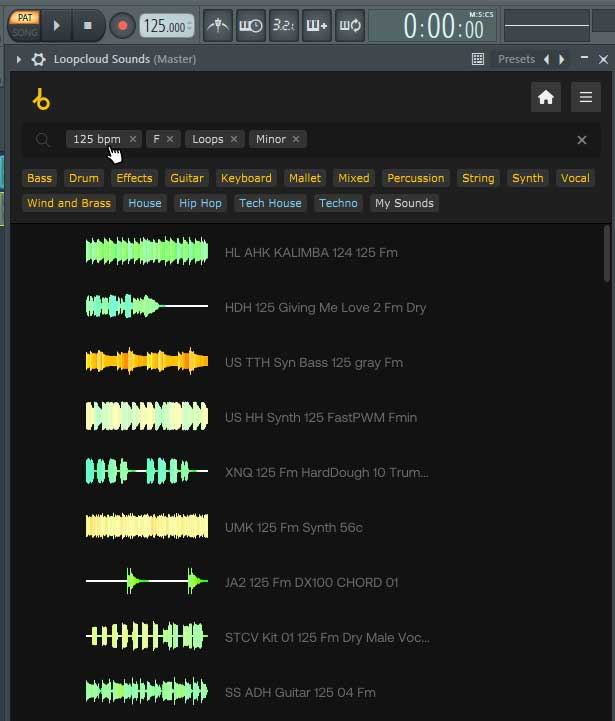
Here’s a quick tip. If you already have a preferred tempo in mind before searching for a sample, you can set your project tempo before going into Loopcloud Sounds and the plugin will allow the option to show loops only at that specified bpm.
You can also specify the desired key, as well as genre, or instrument type from within the plugin’s browser.
Step 2: Adding a complementary melody
Next up, we need to construct a melody to complement our current chord progression. In Mainstage EDM, the melody is the money maker! Because we’ve set our chords to loop twice, we can make our melody span for eight bars in length.
Let’s search for an in-key one-shot synth sample within Loopcloud Sounds, and then drag the sample into our channel rack so we can start building our melody within Fl Studio’s Piano Roll.

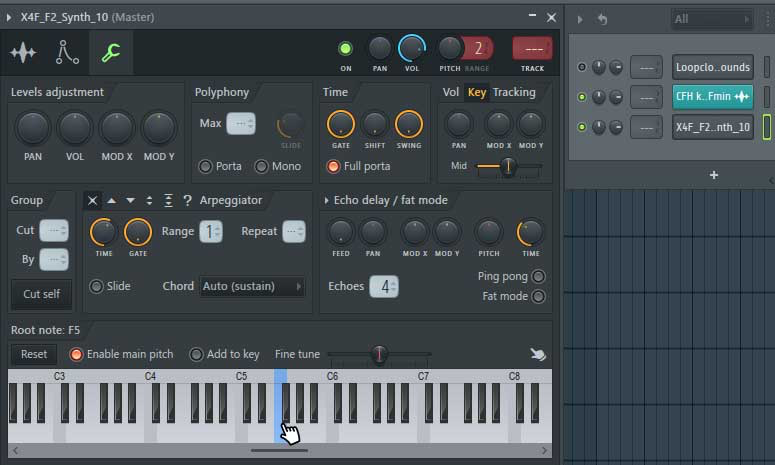
Before we start sequencing our melody inside of the Piano Roll, we must ensure our sample is mapped to the correct key within the sampler.
To do this, first drag and drop your sample into FL’s Channel Rack and left-click on it to open the sampler window. You can then open the Miscellaneous Functions window (marked with a spanner icon) and right-click on the corresponding key on the sampler’s keyboard.
Our sample is in the key of F, so we want to map it to F within the sampler.
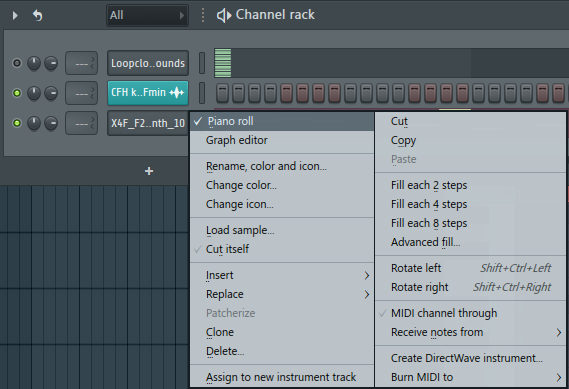
Now we’re ready to construct a melody using our synth one-shot. Open up the sample within FL Studio’s Piano Roll. To do this, right-click on the sample within the Channel Rack and click ‘Piano Roll’.
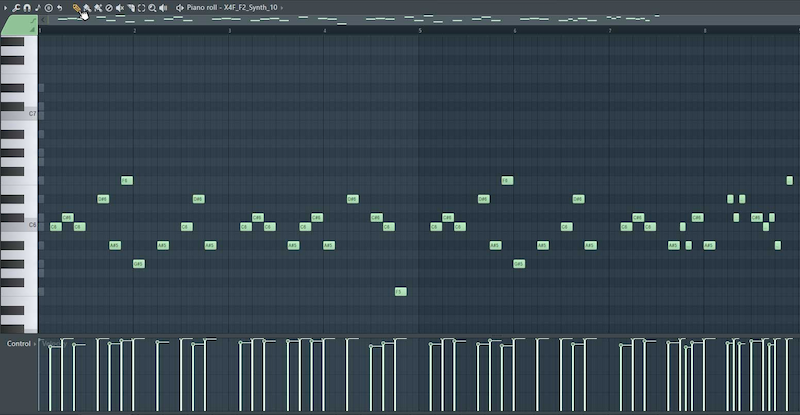
Then we can use the Paint or Draw tool to start placing notes into the sequence. You want to make sure you’re only choosing notes within the same key as our original chord progression sample. For us, that’s F Minor.
Because we’ve intended for our melody to span across eight bars, we’ve added slight alterations to the progression within the second half. This will create more diversity and make our production less repetitive and more enjoyable when listened to.
If you’re not too familiar with music theory, you can use FL Studio’s Stamp function to highlight all keys within a specified musical scale.
To do this, open the Stamp menu within the Piano Roll, select the scale type (for us it’s Minor Natural), and then click on the root note of your chosen scale (for us, F) to paint a full octave of notes within that scale. Now you know what notes you should use when building your melody.
Step 3: Adding Drums and Percussion
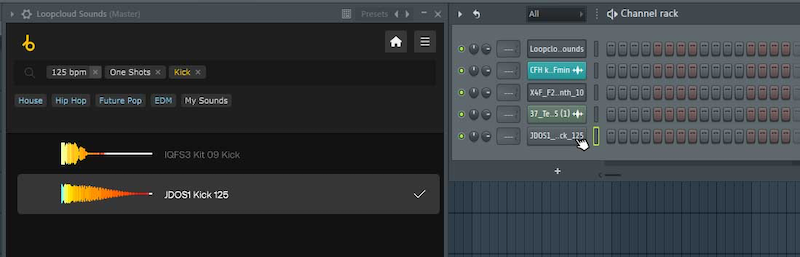
It’s time to add some almighty percussion to our Mainstage track. Let’s start with the kick. We’re going to be using Loopcloud Sounds to find a one-shot kick sample and create our own original pattern inside Fl Studio’s Channel Rack.
First, use the Loopcloud Sounds browser to find a kick sample of your liking, then drag the sample into your Channel Rack.
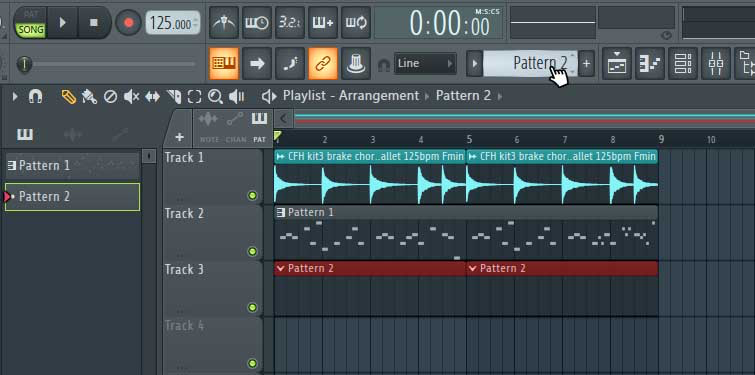
We want to make sure we sequence our kick on a fresh pattern, so it can sit independently of our previously-made melody. To do this, click and drag FL Studio’s Pattern Selector until you’ve selected a new, unused pattern.
Then, using the Paint or Draw tool, paint a couple of four-bar instances of that pattern into the Playlist panel so that we’ll be able to preview our new kick pattern alongside our current composition. Check out the screenshot below for reference.
Now we can start adding kicks into our Channel Rack pattern, whilst simultaneously hearing our composition playback. You can also adjust the Swing knob accordingly to add some automated human randomness to your kick pattern.
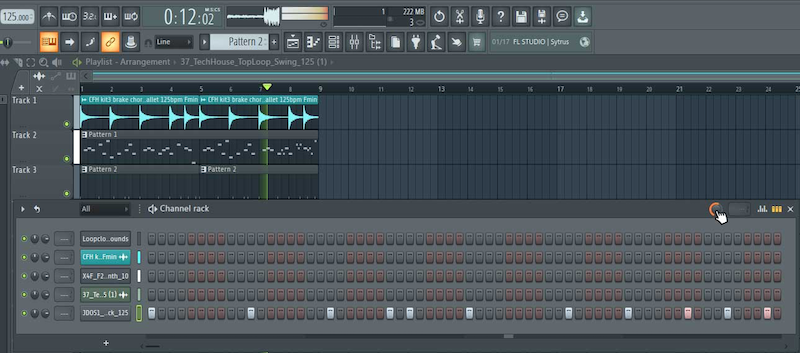
For simplicity’s sake, we’re going to use Loopcloud Sounds to search for a suitable snare and hi-hat loop to finish off our drumkit. However, if you’re up for it, feel free to build your own snare and hi-hat patterns by repeating the same approach we took for the kick - importing one-shots into the Channel Rack.
Step 4: Creating a bouncy bassline
Last but not least, we need a high energy bassline to complete our composition. We’re going to use the same strategy we took when composing our melody and kick – choosing a one-shot from the Loopcloud Sounds library, importing it into the channel rack, and painting our bassline into the Piano Roll.
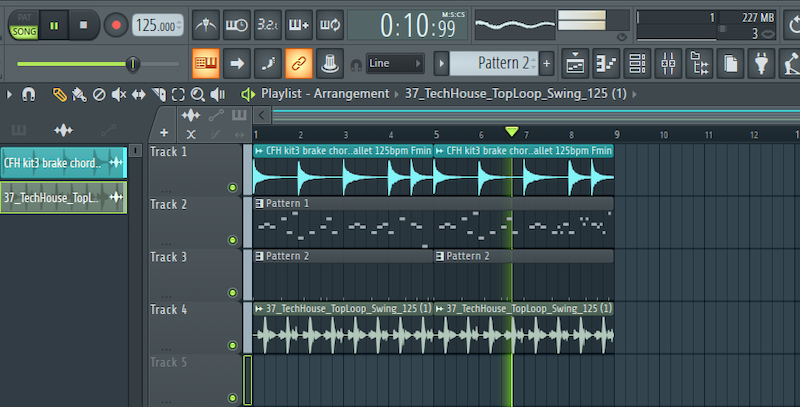
Once you’ve chosen a bass one-shot sample, drag it into your Channel Rack. Then, open up a new pattern, and paste it onto the Playlist just like we did before creating our kick pattern.
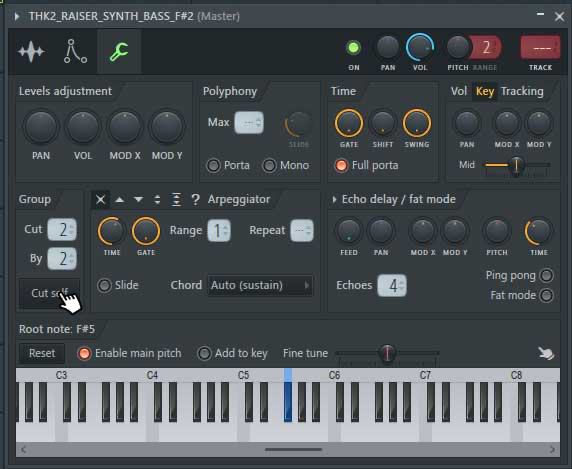
You’ll also need to map the bass to the correct key inside of the sampler like we did with our melodic synth sample in Step 2.
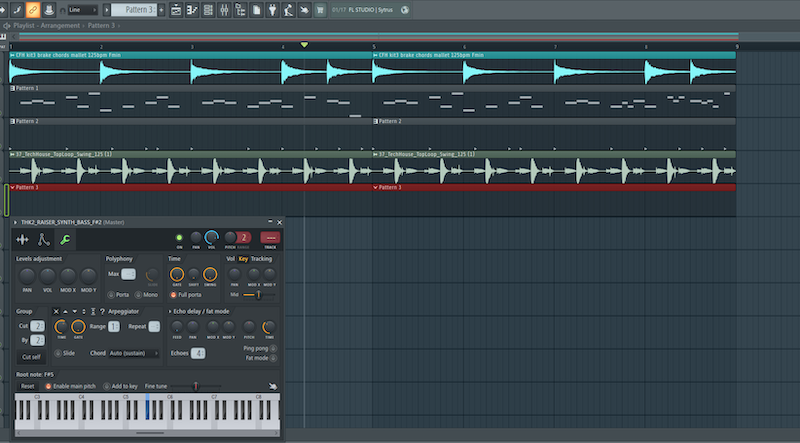
As you can see from the above screenshot, we’ve created a new pattern for our bass and also mapped our bass to the sample’s corresponding key (F#) in the sampler.
For this step, there’s one extra thing we need to do to prepare our bass before we jump into the Piano Roll. We need to set our bass sample to a choke group so that any overlapping, successive notes we might place in our Piano Roll sequence automatically cut off the preceding note.
This is especially important for bass because polyphonic (or overlapping) low-end sound sources often clash, cause distortion and sound unpleasant.
To add your bass to a choke group, head over to the Miscellaneous Functions section of your bass’ sampler window (the same panel that houses the keyboard mapping) and click the ‘Cut self’ button.
Now we can head over to the Piano Roll and start painting our bass melody in. Remember, you can playback your main composition whilst doing this, and can also use the Stamp tool once again to check for what notes you should and shouldn’t use.
A good tip when constructing your bassline is to use the kick pattern as a reference. Your bassline can work in harmony with the rhythm of your kick to create a strong groove for your composition.
Notice that we’ve added a bass note each time our kick hits, also adding some extras along the way.
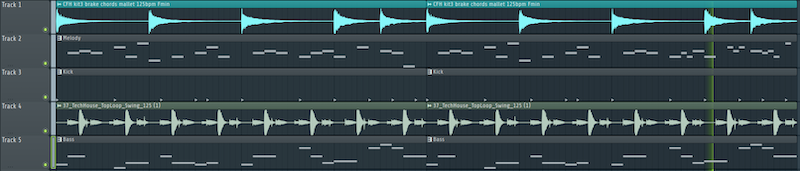
With the bassline finalized, we’ve constructed a bouncy, eight-bar foundation, ready to be arranged into a full-fledged track that can be played out in main stages across the globe!
FAQs
Isn’t using loop samples cheating?
There’s nothing to worry about when using loops in your productions, as long as they’ve been sourced from a royalty-free sound pack such as any Loopmasters pack or any sample available on Loopcloud. Loopcloud Sounds. Anything that can enhance workflow and allow you to increase your output is going to be beneficial in the long run.
If you’d prefer to stick to more creative methods and keep your productions as original as possible, you can always resort to using one-shots, recording your own samples, or adding your own flair to your loops using the various sample manipulation tools at your disposal.
What DAW does Martin Garrix use?
FL Studio is Martin Garrix’s DAW of choice, however, he’s also known to hop in and out of Logic Pro occasionally for specific tasks. It’s important to remember there’s no right or wrong option when choosing a DAW. Although each workstation has their strengths and weaknesses, it’s the creator behind the screen, and how intimately they know their software that determines the quality and efficiency of their work.
How can I arrange my loop into a professional song structure?
Arranging your track can be one of the most enjoyable parts of producing. There’s generally a typical structure to follow, which can vary from genre to genre, however, song arrangement leaves plenty of creative choices in your hands just like any other stage of production.
If you’d like an in-depth guide as to how to structure your Mainstage/EDM loop into a full song, check out our article on 7 Ways to Turn an Eight-Bar Loop into a Full Arrangement.