Blog
50 FL Studio Tips to Become a Pro User
21 Apr '2025
FL Studio’s a top choice DAW for many beginners and, thanks to this guide, you can go from beginner to professional in no time at all

FL Studio is hailed as a light-hearted and fun DAW, with many ‘fruity’ quirks allowing it to fit nicely into that category. Perhaps it’s the intriguing, multi-colored interface and native plugins with coherent design that make it feel like a distinguished and independent software compared to other DAWs in the professional sphere. Or, maybe it’s due to its highly unique and innovative technical features, such as its internal sampler and Channel Rack.
Regardless, it sure can be said that FL studio is probably the most eccentric DAW. In this list of 50 tips and tricks, we’ll be taking you through some of its most intricate advanced features that many are sure to be unaware of, so that you can become professionally familiar with the hip-hop-head, beat-maker-favoured software.
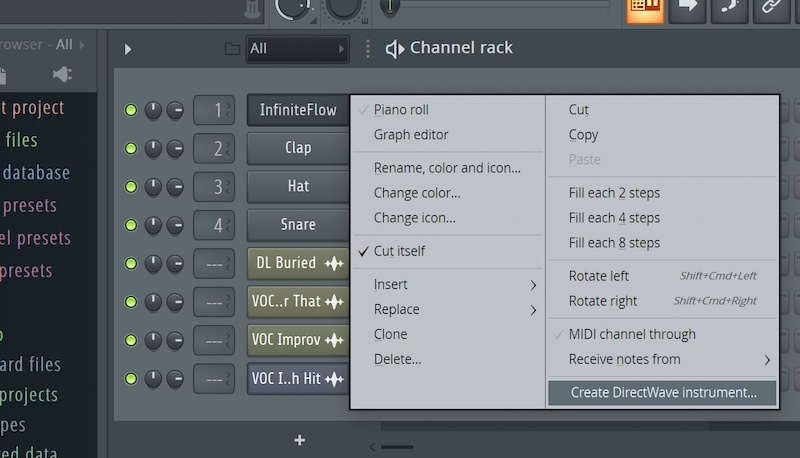
1. Resample your Synths
Collaborating on projects with others is the dream, but if you have different plugins it can quickly become a nightmare. Luckily FL Studio has a powerful workaround.
If you’re collaborating on a track with, say, a Serum bassline and your partner doesn’t have Serum then you can easily turn it into a DirectWave sampler instrument. Just right click on the Serum channel and select Create DirectWave instrument. This will resample your Serum preset into a DirectWave instrument which can be easily shared with anyone who owns FL Studio.
2. Fake it ‘til you Make it
Sidechaining is easy but sometimes you want it to be even easier. Luckily you can use the Fruity Love Philter to create a faux sidechain effect without having to do any pesky routing.
3. The Patcher in the Rye
You can use FL Studio to save your favourite effect chains so you can easily call them up and use them in seconds. Simply put the chains in Patcher so you can use them whenever you need them.
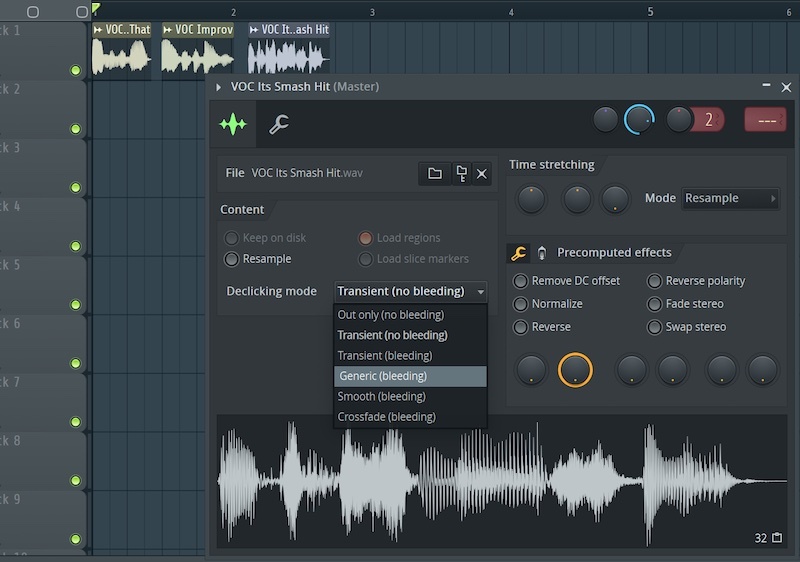
4. All of the Bells and Whistles, None of the Pops and Clicks
When you’re slicing up samples it’s common to get pops and clicks appearing at the beginning and end of your audio clips. The easiest way to get rid of them in FL is to double click on a clip and open the declicking menu - here you can choose from several different declicking methods, test them out and see what works best for you.
5. What’s in a Name?
You can quickly jump to an instruments UI from the piano roll by right clicking on its name in the title bar.
6. FL’s got your Back
Ever been jamming along to a project on your MIDI keyboard and wished you had pressed record? Well don’t worry, FL Studio remembers your MIDI input from the past few minutes and you can call it up at any time, even if you weren’t recording!
Simply go to an empty pattern and select Dump Score Log To Selected Channel, your incredible jam will appear for you to edit to your heart's content.
7. Keep your Plugins where you can See ‘em
FL’s mixer has several view options, one really handy one is the Extra Large Mixer view. With this enabled you can see all the plugins on each track giving you a nice overview of your various channels.
8. Personalise your Metronome
You spend a lot of time listening to your metronome when you’re making music, so why not make it sound a bit nicer? You can change the metronome sound by clicking on the metronome icon and choosing from a handful of alternatives - try them out and see what you like.
9. Always in the Know
If you're relatively new to FL Studio then you may find the hint panel and bar useful. If you haven’t noticed already, every time you hover your mouse over something in FL a window in the top left corner displays useful information, explaining what everything does.
You can also detach this hint panel by right-clicking it and selecting Hint Bar giving you extra flexibility.
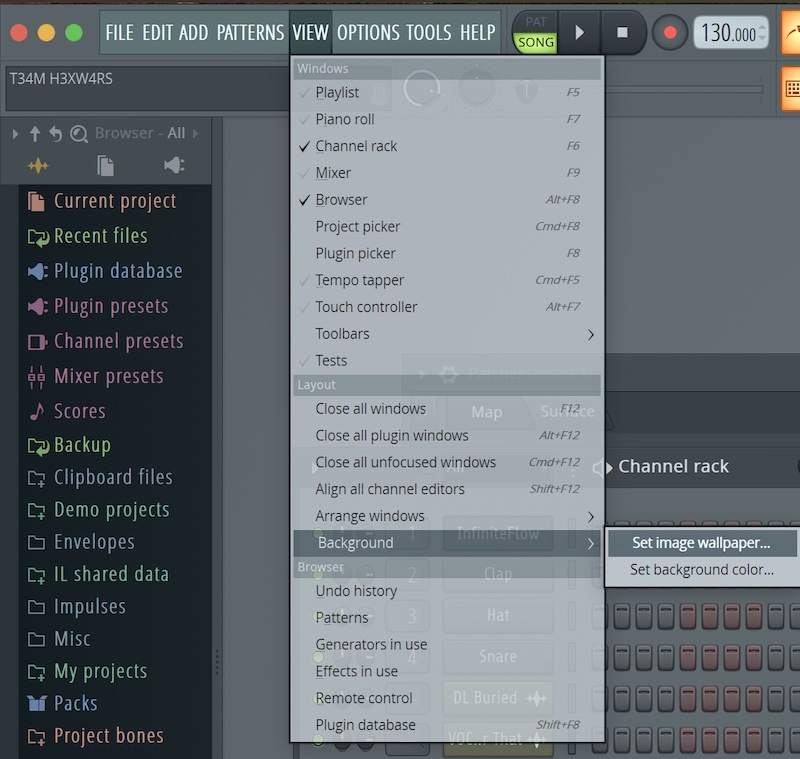
10. Why not Redecorate?
You can customize your workspace with a different background by heading to View >> Background >> Set image wallpaper. Here you can choose from several different FL backgrounds or import one of your own.
11. In Need of a Trim?
You can quickly and easily cut down note lengths so their ends fall on the grid with the shortcut Shift+D keeping your patterns perfectly in time.
12. Start Strong with Templates
Making project templates is a great way to speed up your workflow. Starting a new track with your favourite instruments and effects loaded means you can get composing right away.
What your template looks like is totally up to you, think about what VSTs you find yourself reaching for most and how you normally go about writing tracks. Once you’ve designed your template save it in the Templates folder. Now, next time you load up FL Studio, you’ll be able to go File >> New From Template, and open up your personalised project.
13. Tap in the Tempo
Take the guesswork out of setting your project tempo, right click on the BPM and select tap to tap it in.
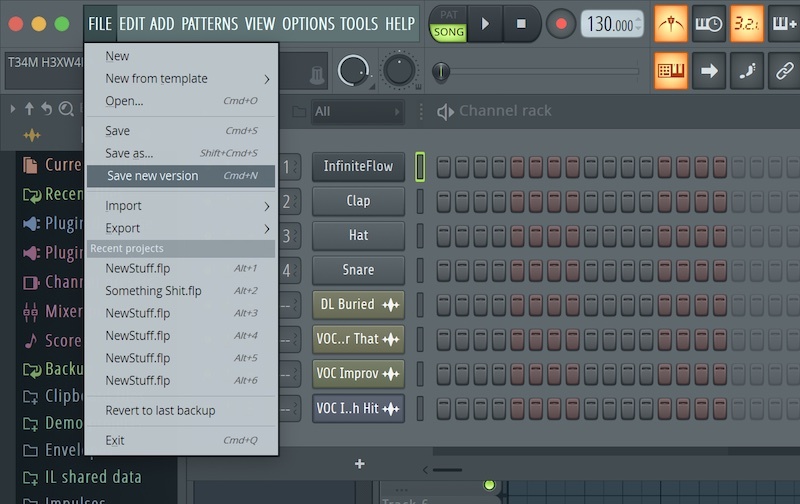
14. Stress Free Experimentation
Do you like to experiment with projects only to end up with hundreds of randomly named versions of the same tune? This can be avoided in FL with the save new version option. This function neatly saves a different version of the project you’re working on making it easy to try things out without losing track of which version is the most recent one. Find it in the file menu.
15. Such Pretty Plugins
When picking a plugin a visual representation of the unit you're looking for can be really handy. If you right-click on an empty mixer slot the plugin picker opens with visual representations of each unit.
16. Zoom with Ease
You can horizontally zoom in and out on the piano roll, editor and playlist in FL Studio by right-clicking in the scrollbar track and dragging up to zoom in and down to zoom out.
17. Snappy Samples
Producers spend a lot of time browsing their samples so it’s important to be able to efficiently. You can use the up and down arrow keys to navigate your sounds and then the right arrow key to play them.
18. It Pays to be Precise
Getting a parameter spot on can be difficult when using a mouse. Luckily you can increase your precision by holding Ctrl on Windows or Cmd on Mac whilst adjusting any parameter - it allows you to really fine tune your settings.
19. High Functioning
You should learn your function buttons, you’ll thank yourself later. F5 opens the playlist, F6 the Channel Rack/Step Sequencer, F7 the Piano Roll, F8 the Plugin Picker and F9 the Mixer - start learning them now and they’ll be second nature in no time.
20. Got an instrumental that
Got an instrumental that doesn’t sit well with your singer? You can repitch the entire project using the master pitch knob, it sits next to the master volume knob and is a real lifesaver. You’ll no longer have to adjust each MIDI clip one by one, now you can simply crank this handy little knob.
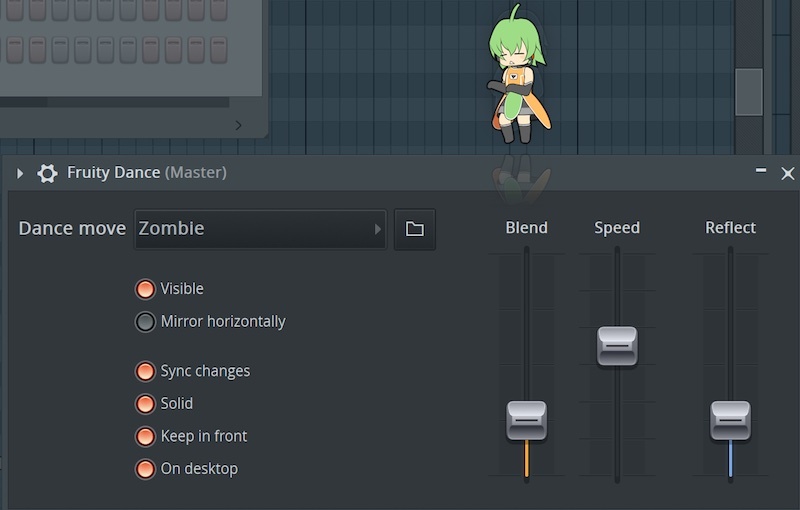
21. Hold Me Closer
Want to add a bit of life to your studio session? Load up Fruity Dance, a little animated person who will move along to your tunes as you create them.
22. Who Needs Gear?
You can do absolutely everything in the box with FL Studio, and that includes playing the Keyboard. You can use you computer keyboard as very impressive two octave MIDI keyboard using the shortcut Ctrl+T (Cmd+T on Mac).
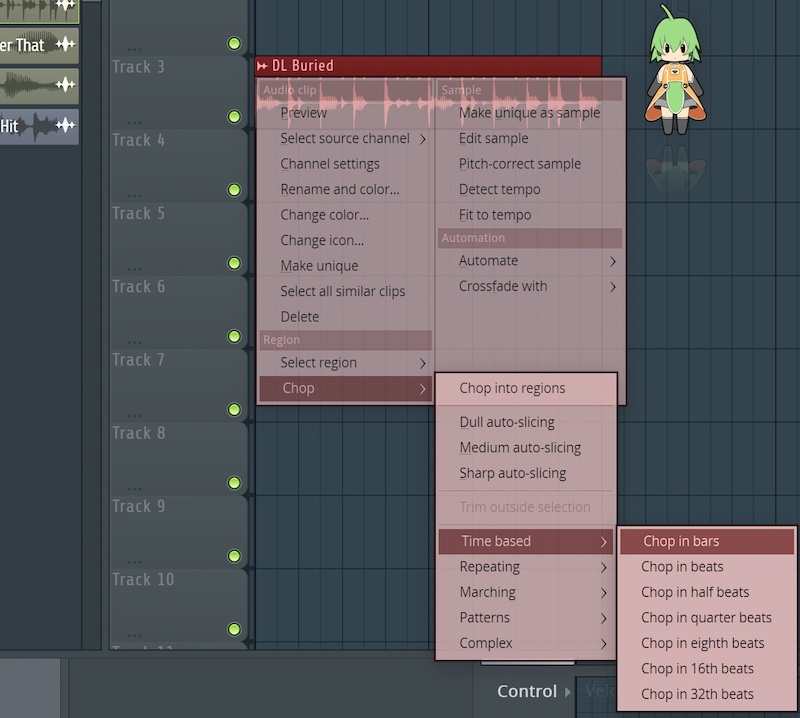
23. Chop! Chop!
You can slice up samples like breakbeats really easily using the Chop function. Simply click in the top left corner of an audio clip and select chop. There are several different chop options available, each one with a slightly different method of slicing.
24. Switch it up
Save time switching between patterns and song playback modes by pressing L.
25. Follow the Leader
If you want your project window to scroll with the playhead as it plays just press the arrow icon just below the metronome.
26. Peach and Browser
You can snap the browser to any side of the screen you like. Simple click and drag it into the position of your choice.
27. Riffing Like Hendrix
FL’s Riff Machine is a unique and powerful plugin which can generate rhythmic patterns and chord progressions. This is something that most other DAWs can’t do so take advantage of it - where are those Ableton snobs now?
28. Nothing Lasts Forever
Stopped your project playing but still got a massive reverb tail going on? Stop it in its tracks using Ctrl(Cmd)+H, this stops all audio being played by the DAW, not just the playhead.
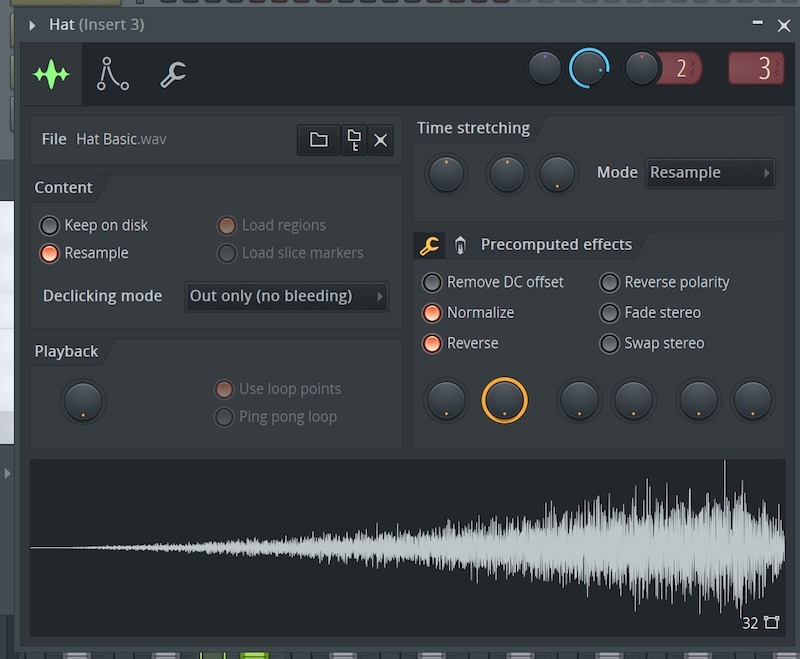
29. Sampler Sound Design
You can really mess with sounds in FL Studio’s various samplers. Try reversing sounds or time stretching them for some unexpected and otherworldly textures.
30. Browse at your Leisure
If you’re a bit short on screen real estate you may be pleased to know you can hide the browser at any time by dragging the right side of the window to the left. Want it back? You can retrieve it at any time by dragging in from the side
31. Stay on Top
If there’s a window you use all the time you can detach it so that it always stays on top of your workstation. To do so open the dropdown menu that’s located in the top left hand corner of every window in FL and select Detached. It’s as simple as that.
32. Important Advice
You can open an audio file in FL Studio’s native Slicex, Fruity Granulizer, Sampler or Fruity Slicer by right clicking on the sample and selecting the appropriate option from the drop down menu.
33. Writing Melodies Yourself? No Thanks
The piano roll in FL Studio has a useful Randomize feature which will generate melodies for you. Great for building tracks at lightning speed!
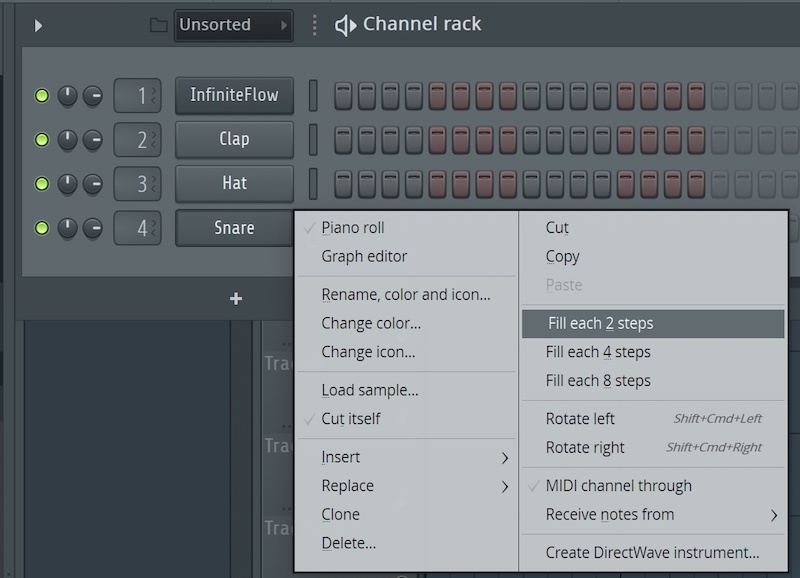
34. Easy Beats
In hip-hop and electronic music genres you spend a lot of time putting kick, snare and hat hits in exactly the same place - wouldn’t be nice if there was a way to automatically add, say, a kick on every quarter note? Well rejoice because you can do exactly that, just right click on any channel and select fill each 2, 4 or 8 steps saving yourself a lot of time and a lot of clicking.
35. Make your Mark
You can add markers to your tracks using the shortcut Alt+T. Each marker can be named which is useful for labelling different sections of your songs and getting your structure down.
Markers can also be functional, if you right click on a marker you can set it as the song start point, a loop point, a record point or a change in time signature.
36. King of the Swingers
Add some life to your rhythms with swing - it’s easy to do, just dial up the swing slider in the top right hand corner of your drum pattern editor.
What does swing do? It simply takes every other note slightly off the grid to a more groove and, well, swing to rhythms making them sound a bit more like a human played them.
37. Boo!
Speaking of adding life to your beats, do you know about FL’s Editable Ghost note function? From the Piano Roll go to Menu >> Helpers >> Editable Ghosts, this will allow you to move and edit your ghost notes instantly resurrecting your lifeless rhythms!

38. Separate Channels into Patterns
In FL Studio, your instruments aren’t automatically linked to tracks and split like in other DAWs. Instead, you can quickly whip up a short loop with all elements on one pattern in the Channel Rack. However, you’ll want to separate them when adding them to your Playlist and assigning them to the mixer. You can instantaneously split all of your channels into individual patterns by right clicking the Pattern drop-down menu and selecting ‘Split by channel’
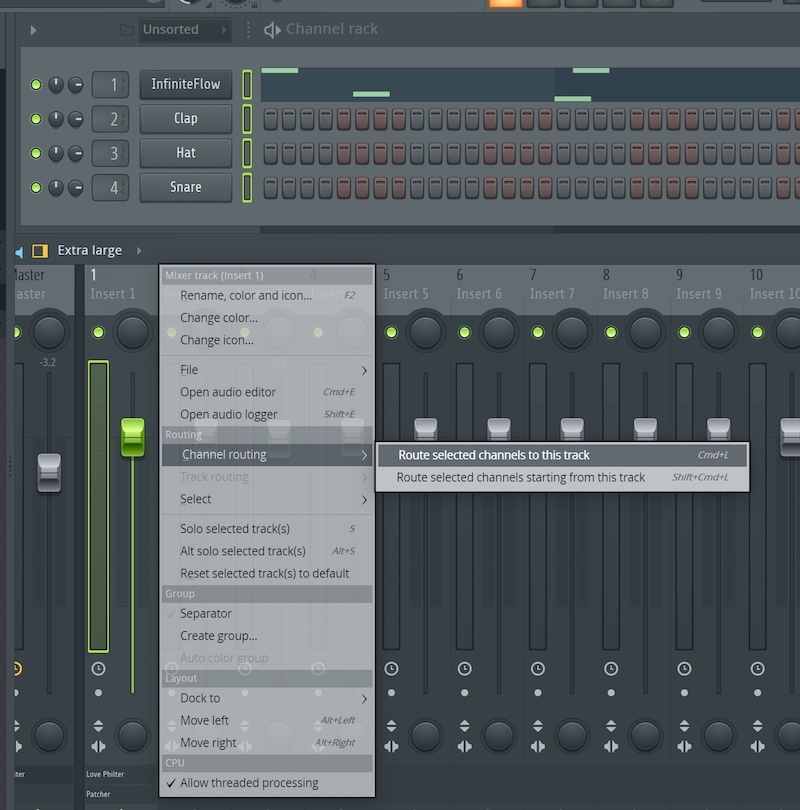
39. Auto-assign to Mixer
Following the last tip, if you want to automatically send all of your individual instrument elements (or Patterns) to their own designated mixer track, start by selecting them all in the Channel Rack panel. To do this, click and drag the vertical rectangles next to the channel name. They’ll highlight green once selected. Then, choose your starting mixer track, right-click it and navigate to Channel Routing. Then choose ‘Route Selected Channels starting from this track’. Voila! You’ve just saved a heap of time.
40. Top Priority
When working on a project it’s often a good idea to place your more important elements at the top of your workspace. In FL you can move a selected channel up or down by using Alt+Up/Down.
41. What it Says on the Tin
Of FL’s native effects units Soundgoodizer may have the strangest name - that being said, it is an accurate one.
Whack it on a channel for a rich and full sound. It’s various multiband compression presets will give you a nice sound in no time.
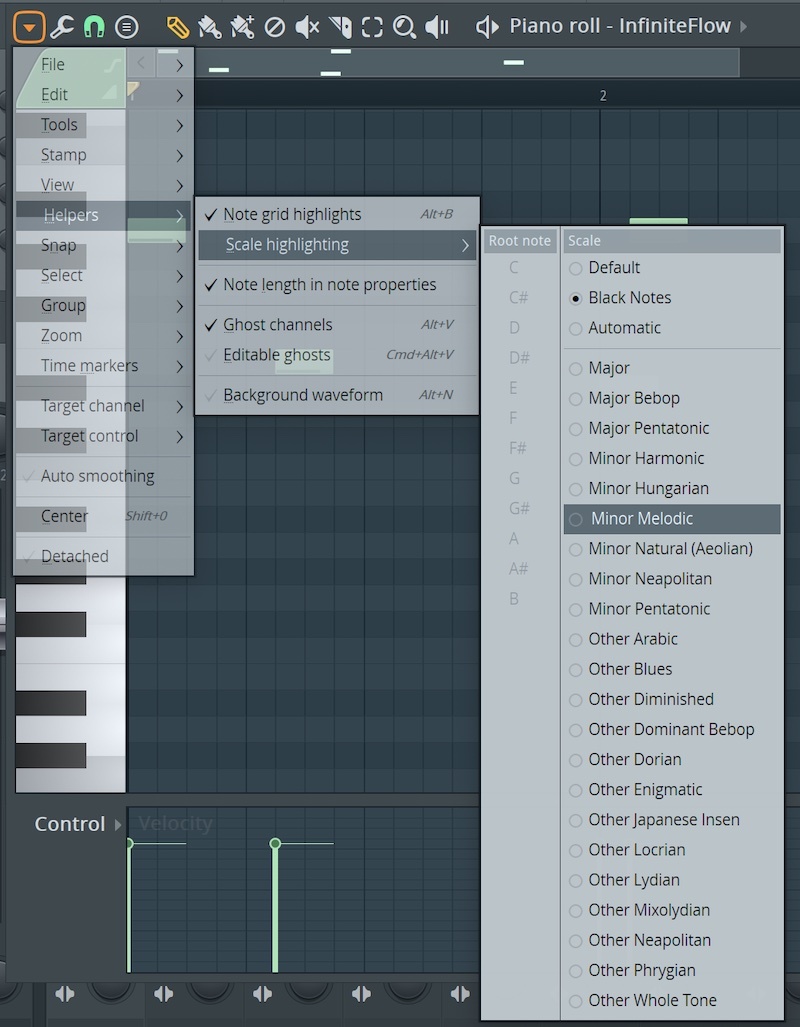
42. Great in Theory
If you’re not the best when it comes to music theory you’ll appreciate this tip. In your piano roll go to Helpers >> Scale Highlighting and choose the root of your scale and your scale type - Now the background of your Piano Roll will light up on the notes in that scale.
43. E-Z EQ
If you need to make some basic spectral adjustments to an instrument it might not be necessary to load up a fully featured EQ. Instead you could try using the basic three-band EQ located below the FX inserts in FL’s mixer.
44. Time is of the Essence
Sometimes you want to know how long your track is, luckily you can change the bar counter at the top of your project into a minute counter. Simply right click on the bar counter and select Minute : Second : Centisecond to display time information.
45. Window Overload
Been messing about with the window positions in FL Studio but now everything looks a complete mess? Fear not, you can return them to their default positions with a simple Shift+Cmd(Ctrl)+H.
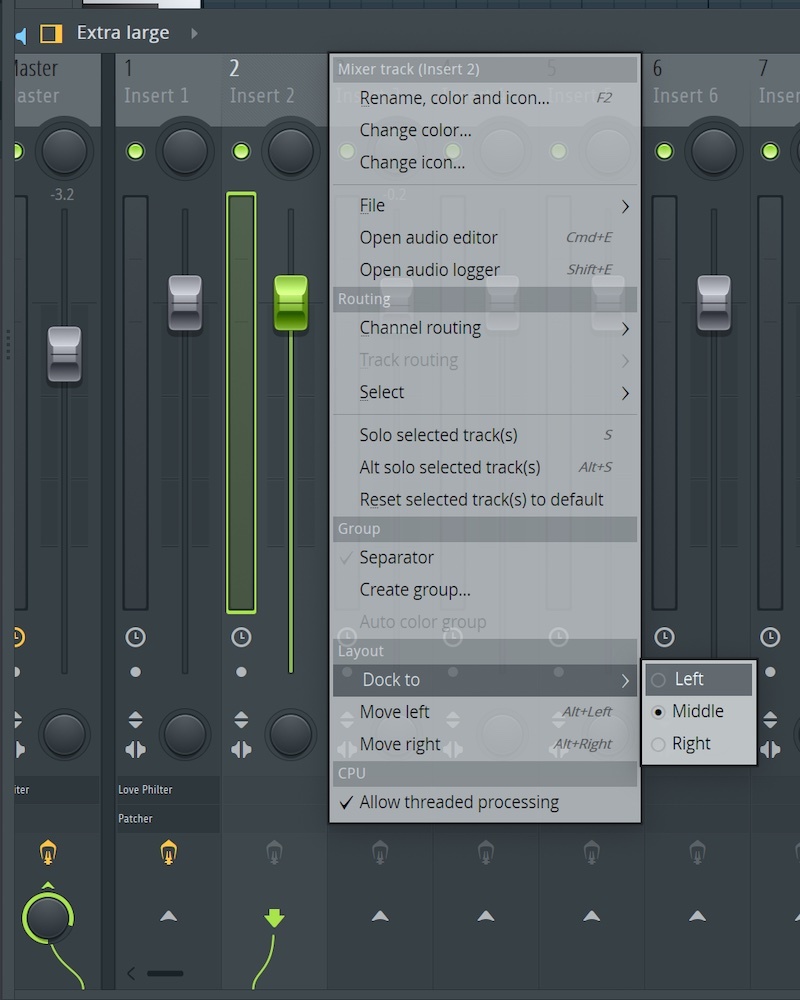
46. Stay Organized
As your projects get more and more complex organisation becomes essential. One trick which will come in hand is the docking function in FL’s Mixer. You can right click on a mixer track and select Dock to >> Left/Right to keep important tracks on the far let or right of the mixer.
47. Wave Goodbye
FL Studio has an Oscilloscope at the top which is a cool little feature. If you want to see the frequencies your track is taking up you can change it to a spectrogram with a right click.
47. More Organization
You can move tracks around in the mixer holding Alt and using the left and right arrow keys.
48. Up All Night
You can check out how long you’ve been working on a particular project by hitting F11 - you might be shocked by what you find…
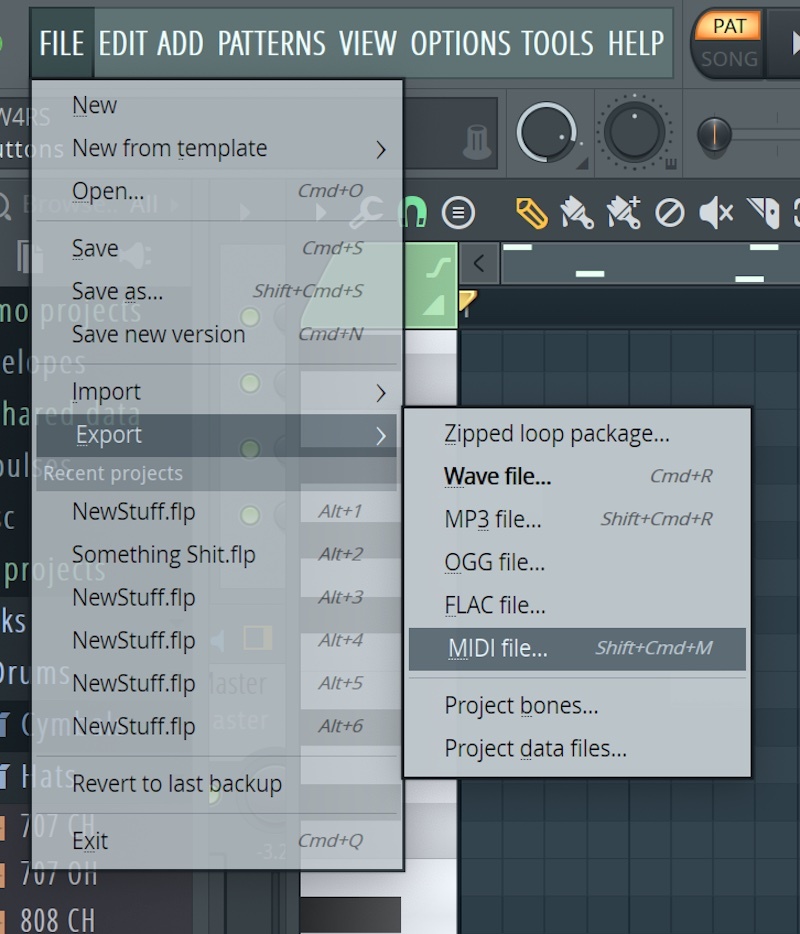
49. Share your MIDI
If you want to build a MIDI pack you can easily export a MIDI clip as a MIDI file by going to File>>Export as MIDI file.
50. Quick Rename
You can rename anything in FL by Shift clicking on it - a big time saver.