Blog
How to Record Acoustic Guitar – Full Guide and Tips for at Home or in the Studio
24 Jul '2024
Get the most out of your acoustic guitar with these tips and tricks for capturing high-quality guitar recordings

Acoustic guitars are highly versatile instruments, making them a popular instrument in many musical styles and genres. Like the piano, guitars have several components that work together to create the overall sound, but this can make it challenging to record guitars accurately and realistically.
Perhaps you’re a guitarist considering making your first recordings, or you’re a producer or engineer with limited experience in recording stringed instruments. Either way, this article will present some tips, tricks and techniques for capturing professional guitar recordings.
What is the best microphone for recording guitar?
Several factors come into play when selecting a microphone for recording acoustic guitar, including microphone type, frequency response, diaphragm size and polar pattern.
Microphone types
Most microphones fall under the category of either condenser or dynamic. Assuming you’re recording a solo guitar at home or in a studio, a condenser mic may be preferable for recording acoustic guitars, as they tend to capture more clarity in the high frequencies. This means they are likely to translate the string part of the guitar more accurately.
If, however, you’re recording in a live environment, or in a room with other sound sources, a dynamic microphone may be a more suitable choice for recording acoustic guitar. Dynamic microphones are less sensitive than condensers, making them less susceptible to picking up external noises.
Frequency response
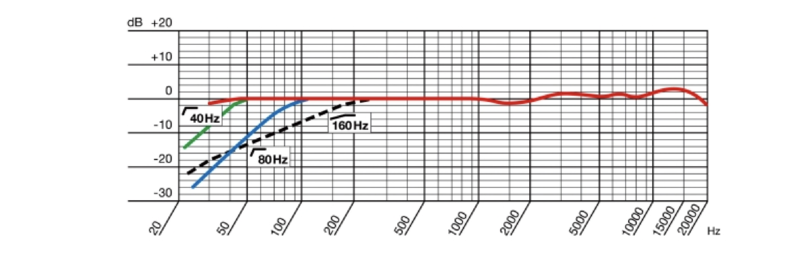
In the same way that guitars have a different tone and character, microphones each have a different frequency response. This refers to the frequencies that they are more sensitive to across the spectrum. If you know your guitar has particular frequencies that you want to attenuate or accentuate, you can check a microphone’s frequency response chart to see if it aligns with your requirements.
Diaphragm size
You may have heard the terms large-diaphragm and small-diaphragm condensers, but what does that mean in the context of recording guitars? Large-diaphragm condensers usually sound bigger and warmer, while small diaphragm condensers tend to be better at picking up the finer details. Smaller diaphragms are also lighter, which makes them more responsive to transient information.
All things considered, small-diaphragm microphones are more suited to recording the detail of your guitar such as the finger and string noise, while large-diaphragm mics are more suited to recording the body of the sound.
Polar pattern
The final thing to consider when choosing a microphone to record an acoustic guitar is its polar pattern. A microphone’s polar pattern dictates its recording directionality, which is crucial when recording acoustic guitar due to its various sound-emitting components.
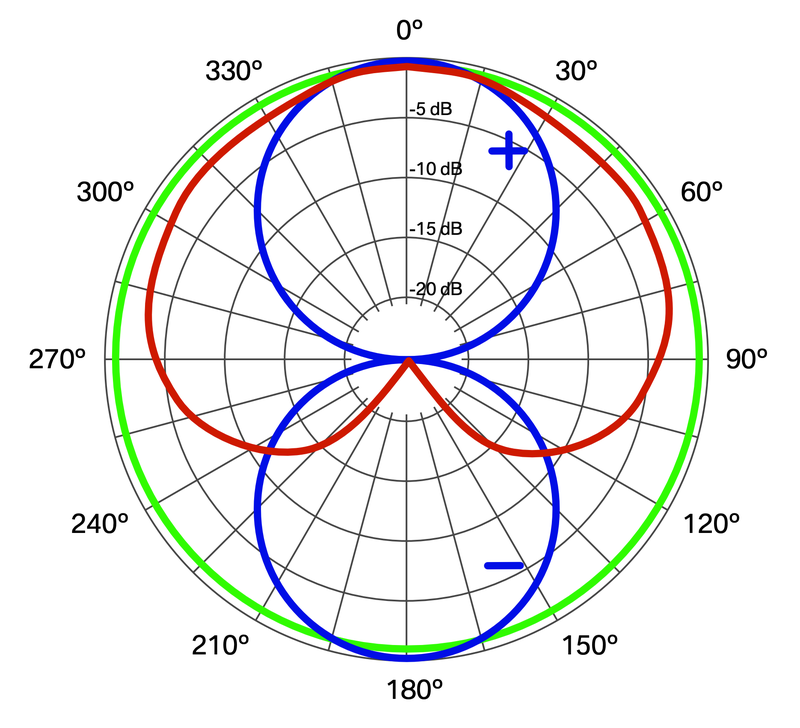
The cardioid polar pattern is popular due to its directionality that picks up quality sound in a heart-shaped pattern in front of the microphone, making it great for recording isolated sound sources. Omnidirectional microphones record in all directions equally, making it a suitable polar pattern for recording room noise. A figure-eight microphone is equally as sensitive in front as it is behind, but rejects sound to the sides.
There are some other polar patterns that are variations of the above but are outside the scope of this article. You can also choose a microphone with switchable polar patterns, which might give you some more flexibility when choosing a recording technique. In the next section, we’ll discuss how you might use each of these polar patterns to record acoustic guitars.
How to position your microphone for recording acoustic guitar
With the equipment covered, let’s move on to some staple acoustic guitar recording techniques that you can employ yourself. These should all serve as useful starting points, but ultimately you should use your ears and adjust your microphone type, position and recording technique according to the sound you’re trying to achieve.
Use a single mic on the 12th fret or bridge
This is one of the quickest and easiest guitar recording techniques, and can deliver professional results when applied correctly. For this technique, you’ll just need a single microphone, ideally with a cardioid polar pattern. It can be a small or large-diaphragm condenser mic, but do consider the differences we outlined in the last section when deciding which to use.

Place the microphone approximately 10 inches from the 12th fret of your guitar, with the diaphragm facing it directly. This should give you a good balance of the body coming from your guitar’s sound hole, and the higher frequency detail coming from the strings and fretboard. If you want to tweak the balance between these two elements, try adjusting your microphone’s angle. You can also move your microphone closer or further away to focus on particular sound sources, or to capture a broader range of frequencies.

If you want to pick up more of the percussive finger sound, try aiming the microphone at the bridge instead. Small adjustments to the microphone position and angle can have a drastic impact on your acoustic guitar recording, so it’s worth taking a few test recordings and comparing their tonal and transient qualities.
Stereo XY configuration
This next technique requires two identical mics; ideally a matched pair of small-diaphragm condensers, as these can be positioned more precisely. You’ll also need two mic stands or a stereo bar to get both into the appropriate position.

Position both microphones parallel to the ground, with the heads of the microphones containing the capsules on top of each other at a 90-degree angle. Then position the mics around 10 inches from your guitar’s 12th fret as explained in the first single-mic technique. One microphone will pick up more of the body of the guitar from the sound hole, while the other picks up more of the string sound.
Once recorded into your DAW, pan the recordings away from each other to create a wider and more immersive sound than is possible with a single microphone. Be aware that this can introduce phase issues, as you’re combining multiple signals. If necessary, you can invert the polarity of one of your recordings, or you can adjust the phase of your recordings by offsetting the timing by a few milliseconds.
Advanced Microphone positions
When recording an acoustic guitar, experimenting with different mic setups can significantly influence the resulting sound. Two advanced techniques worth exploring are the ORTF and Mid-Side (M/S) configurations. The ORTF setup, developed by the French Broadcasting Organization, involves placing two cardioid microphones 17 cm apart at a 110-degree angle, which mimics the natural spacing and angle of human ears, providing a wide, natural stereo image. On the other hand, the Mid-Side technique uses one cardioid mic aimed directly at the sound source (mid) and one figure-8 mic positioned at a 90-degree angle (side), capturing the ambient sound from the sides.

This setup allows for flexible stereo width adjustment during the mixing process by manipulating the mid and side signals. Both techniques offer unique advantages in capturing the rich, nuanced tones of an acoustic guitar, making them excellent choices for achieving a professional, dynamic recording.
Where to record acoustic guitar?
When recording any instrument, it’s important to try and keep external noise to a minimum, whether that’s road noise, other instruments or electrical noise. Unless you have a purpose-built soundproof studio, this is often easier said than done. Try to record in environments and at times where there is less likely to be extraneous noise.
You should also consider your room’s acoustics when deciding where to record. Small, square, empty hardwall rooms are prone to room noise and phase issues, making them an acoustician’s worst nightmare. If possible, a larger rectangular room with room treatment will help you to capture a much cleaner and more transparent sound from your guitar.

As with the choice and position of your microphone, there are some good rules of thumb when deciding on a recording position, but as long as it sounds good to your ears, it’s the right recording configuration for you. Try and take some test recordings in different positions in different rooms, and see how each of them sounds, and you’ll quickly find some sweet (and not-so-sweet) spots.
Using guitar samples from Loopmasters
There are many reasons you might opt to use professional acoustic guitar samples instead of recording your own. You might still be working on your guitar playing technique, or perhaps your guitarist has gone AWOL. You may also be seeking a specific playing style or guitar tone that you can’t replicate at home, in which case a royalty-free acoustic guitar sample can save the day. With over four million professionally engineered samples, finding a suitable acoustic guitar sample won’t take long with Loopmasters and Loopcloud.
There’s an entire category of samples dedicated to acoustic guitars, so no matter what kind of music you’re producing and what kind of sound you’re looking for, you’ll be able to find it on Loopmasters. If you’re looking for a versatile bank of acoustic guitar sounds, the Loopmasters Acoustic Blueprints pack contains nearly 300 guitar samples. From acoustic guitars to electric basses, ukuleles and dulcimers, this pack is designed for use in all manner of contemporary musical styles.
Similarly, the IQ Samples’ Flow – Guitar Vibes pack contains over 350 acoustic guitar samples that are perfect for sparking inspiration or adding a plucked string element to your latest production. Whether you’re making Pop, RnB, Soul or Hip-Hop, the entire pack is well worth adding to your sample library. Alternatively, you can use Loopcloud’s Audio Filters to refine your search by key, tempo and more.
If you’re looking for acoustic guitar samples for more specific use cases, you can use Loopcloud’s Genre tags to find exactly what you’re looking for. There’s Loopcloud’s Modern Latin Guitars if you need a Latin flavour, or House of Loop’s Lo-Fi Chill Guitars if it’s Lo-Fi you need. For more creative and otherworldly guitar samples, the Cinematic Guitars & Soundscapes pack from Organic Loops has you covered.
From £5.99 per month, a Loopcloud subscription gives you access to over four million samples, including the sample packs mentioned above. You also get Loopcloud’s highly playable and intuitive plugin instruments, DRUM and PLAY, plus cloud storage and much more.
FAQs
What equipment do I need to record an acoustic guitar?
To record an acoustic guitar, you will need a guitar, a microphone and mic cable, a guitar stand, an audio interface and a digital audio workstation.
At what level should I record my acoustic guitar?
When recording acoustic guitar, you should set the levels so that the audio is peaking at approximately -18dB. This gives you plenty of headroom but also prevents you from having to turn the gain up too much after recording, thus increasing the noise floor.
What type of microphone is best for recording acoustic guitar?
You can use any type of microphone to record an acoustic guitar, but some microphones such as condenser microphones are better suited, as they will pick up more of the high-frequency detail from the guitar strings. You should also consider diaphragm size, as well as polar pattern when choosing a microphone for recording acoustic guitar.