Blog
Starting New Ideas with Samples: 10 Strategies
24 Sep '2025
Sometimes, transforming one sample in just the right way is all it takes to put you in the right direction towards inspiration, and spark off a whole new track

Photo by Antoni Shkraba Studio on Pexels
Have you found some samples that you like, and you know you want to do something with them, but you just don’t know where to start?
Maybe you aren’t feeling particularly creative, or you are new to producing?
Sample flipping could help.
Sample flipping is taking a sample and making it your own - manipulating and repurposing it. This could be slicing it up and rearranging it, adding FX, using it in wavetable synthesis, and many other techniques.
Not only is sample flipping a good way to come up with new ideas. But it can be a great way to put more personality into your music and develop your own sound.
Getting the basics of a track down these days can be easy, with high-quality sample packs and presets available. But you run the risk of sounding like everyone else without making samples your own.
In this article we are going to cover six sample flipping techniques to start off new ideas in the studio and get you vibing.
1. Slice it up and get creative with a sampler
Samplers have been a staple of electronic music from the beginning. There are many ways to get creative and flip your samples into something new with a sampler.
One method is to slice up your sample into a number of different pieces and assign each one to a key on your keyboard or MIDI controller.
This is a popular technique with vocal samples in particular.
There are a number of ways to do this. If you use Ableton you could use the “Slice to New MIDI track” function to automatically slice up a sample, and add the slices to a sampler, with each slice triggered by a different piano note.
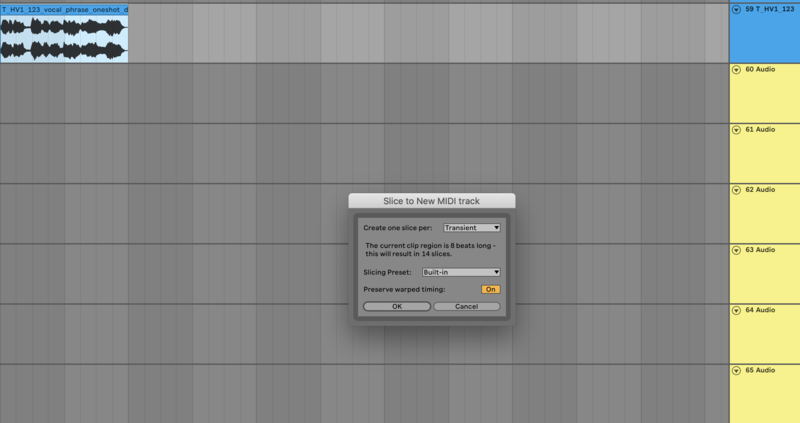
You can choose how to slice up your sample, such as where to slice – options include at the transient or in certain time signatures. It will tell you how many slices the setting you choose will create. You can also choose a slicing preset, and whether or not to preserve warped timing.
This slices up a sample and assigns each slice to a different note in Ableton’s sampler in a new MIDI channel.
Now you could press record and jam out some new ideas with your keyboard or MIDI controller, or you can rearrange the MIDI manually in piano roll, creating new ideas and exciting patterns.
2. Use Loopcloud’s Flip Sample feature
For those who don’t know, Loopcloud has recently been upgraded with a neat new sample flipping ability. Now, you can use a built-in AI tool. With 1,000+ carefully considered algorithms to instantly rework a sample into a unique counterpart.
The best part? You can keep cycling the effect indefinitely until the sample feels right, and it mixes processing FX with slicing, reversing and time-stretching to manipulate samples. This gives you the chance to make any given sample completely unique to your production with ease.
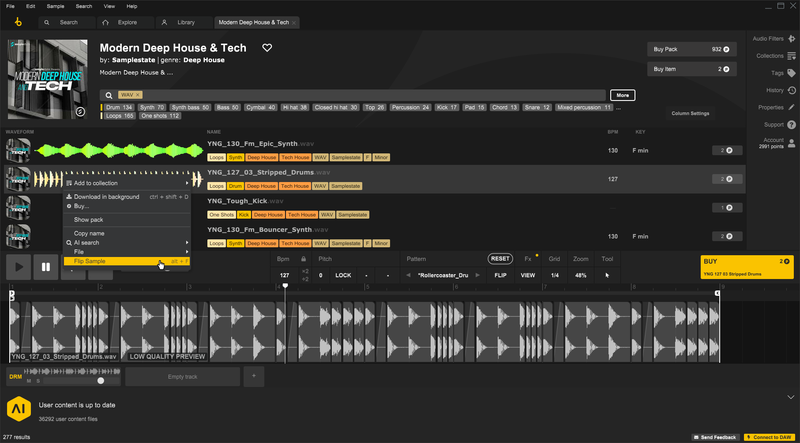
Flipping a sample with this feature couldn’t be easier. Simply right-click any sample from the Loopcloud interface and select Flip Sample. Alternatively, you can hit Alt+F with the sample selected. From there, you can drag and drop the flipped sample into your DAW.
3. Sometimes less is more – creative sidechaining
Probably the most well-known example of sidechaining is lowering the volume (or the compressing) of certain parts of a track when the kick drum hits. But you can also use sidechaining creatively for some interesting results.
You can create new rhythms, vocal stutters and other variations of a sample using creative sidechaining or trance gating.
This is a technique that can work well on longer samples.
One way to use sidechain creatively is by using an LFO to modulate volume, which most DAW’s will have. Or you can use one of the many 3rd party sidechain plugins such as Duck.
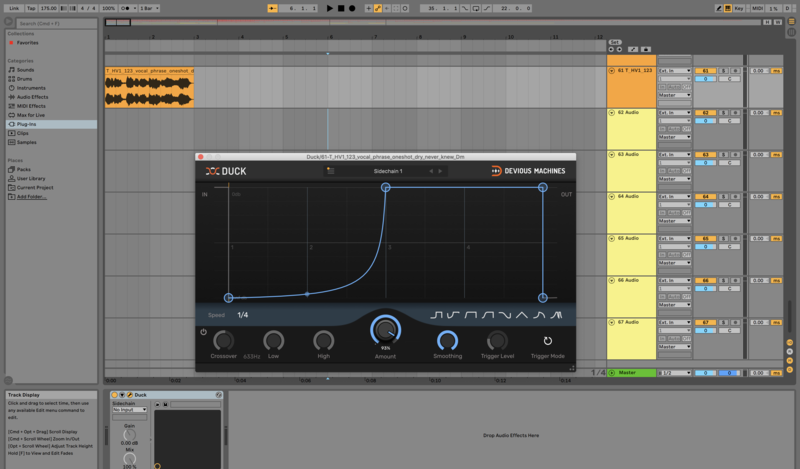
Many of the sidechain plugins come with a range of preset shapes and patterns, and you can get creative with your own. They also typically have multiple time signatures to choose from, adjustable mix amount, and other functions.
If you don’t have a plugin you could also use MIDI to trigger a noise gate to close, or a compressor to compress at certain points.
You could combine this technique with any of the other techniques mentioned in this article for even more variation.
4. Granular synthesis
Using granular synthesis, you can take a sample, and slice it into loads of tiny pieces called grains, and then have them overlap in creative ways to make some really interesting textures.
In the video above we flipped a guitar sample using the granular synthesizer Quanta 2.
First, we took a guitar sample from the Loopcloud Editor and dragged it straight into Quanta 2.
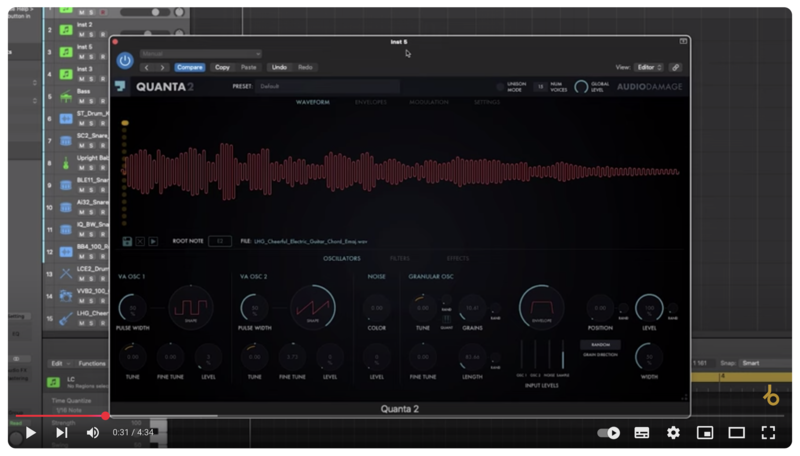
Quanta will automatically set your route note which makes things super easy. We played with the number of grains and the length of the grains, and you can also play with the position of the play head. And you can randomise all of these controls too. Plus, you have all of the other benefits of using synths like filtering, envelopes, modulation etc.
This technique can be a great way to enhance a simple one-shot.
The Loopcloud Editor has some granular synthesis functions, allowing you to see how different samples from Loopcloud’s library, or your own, sound granulated, right there in the editor.
5. Wavetable synthesis
Wavetable synthesis uses samples to generate sound. A transformative way to flip a sample is to use it as a wavetable in wavetable synth.
In the video above we added a synth sample to a basic bass patch to create something new and exciting.
We started with a super basic bass patch in Serum.
Next we dragged in a synth sample from the Loopcloud Editor to use it as a wavetable for the first oscillator to generate sound from.
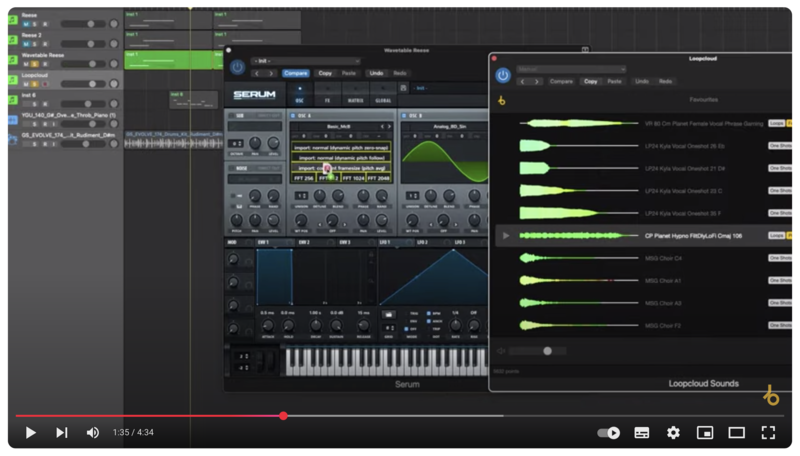
We played with the wavetable position. Then we cranked up the unison. Opened up the wavetable editor and adjusted the harmonics. Then we got a bit more exciting and did some comb filtering. We used an LFO on the drive of the comb filter. Then we used an LFO to set the volume of both oscillators to add a bit more movement. Finally we added some effects - some distortion, a flanger, a little bit of reverb with the low end rolled off. We then applied some more EQ and used LFO’s to make it move. And finally, just a bit more distortion at the end to sweeten it up, using IZotope Trash and a Logic Auto-Filter.
6. Layering samples together and resampling them
This may sound like a pretty basic technique, but it can be used in a range of different contexts to do some quite exciting stuff. A common use of layering samples is with drums.
In the video above we layer a kick drum and rumbling bass effect together, resample them, and then process them together to add atmosphere to a Techno track.
We start by layering the kick drum and rumbling bass effect, dragging them straight from the Loopcloud editor into Logic Pro.
Next we sidechain them together so that they are glued.
Then bounce it in place and put it into a Techno track.
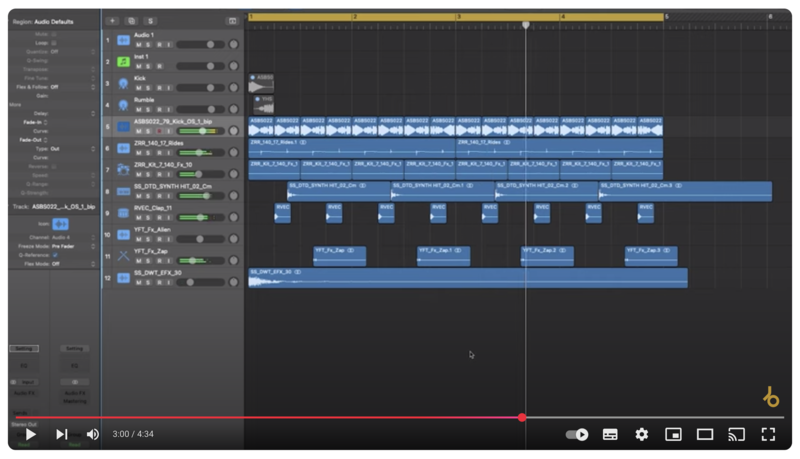
The good thing about having both the layers gelled into one bounce is the fact that you can then apply reversing, gating, compression and all those things on one cohesive sample.
You can also use layering and resampling to create more musical effects. We stacked a few choir one-shots together to create a chord that we could drag into a sampler, and then play something in with.
7. Turn noise into music by extracting harmonics with EQ
In the video above we turn a resonance in a noise sample into music, by extracting harmonics with EQ, bouncing in place, and then playing the sample in a sampler.
We take a noise sample from the Loopcloud library that has a resonance at around 490Hz which is a B flat. We give the resonance a boost at that area with an EQ. And then replicate that with a duplicated version of the same EQ with less of a boost.
Next we bounced this in place and dragged it into a sampler. You can really clearly hear the tone, and it almost sounds pan flute-like.
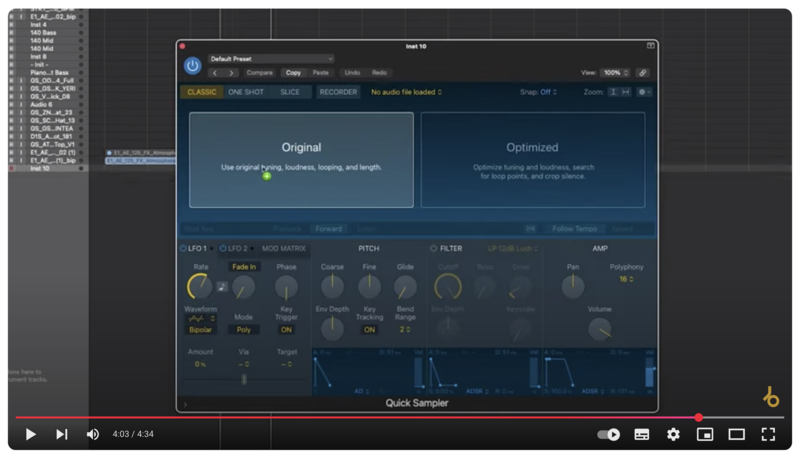
You can really clearly hear the tone, and it almost sounds pan flute-like.
Once in the sampler we could play a melody in with the sound.
8. Rework samples into transitional effects
There are so many creative ways we can use samples in our productions, as you’ve probably already gathered. Another niche way is to resample various audio sources specifically for transitional effects in our tracks, such as risers, downers, impacts, background SFX, and more.
We can try a couple of these now. The simplest method is to reverse a snare, cymbal or open hi-hat (something with a relatively elongated tail). You can then use this reversed audio to emphasise certain hits, or even section transitions. Try whackin' a reversed snare right before an actual snare, and notice how much extra oompf it brings.
![]()
Another way to make a similar effect is by reversing a reverb tail. You can do this by printing the pure wet signal of your reverb as a separate audio sample, then reversing it. The process varies across different DAWs.
![]()
You can use other types of samples (not just reversed tails) for different creative effects, like creating your own impact sounds and layering them with drum hits, or creating your own drum sounds completely. The creative freedom is yours to explore!
9. Create your own SFX
You can sculpt different samples for use as background SFX. This is especially popular in more narrative-driven music, like rap, where the sound effects add more depth and emphasis to the story told through the lyrics. This creates a theatrical scene.
For example, the lyrics might be about drinking alcohol and feature a bottle chink sample or a gulping sound. Yet, why stop there? You can flip such samples, process them with effects, or layer them further to add extra emphasis and emotion.
Building upon the drinking alcohol example, why not add a distorted delay to the effect to give off a drunken, seeing-double kind of vibe? Combining this with intentionally chaotic music in your mix and the vocalist's lyrics can really help to develop a theatrical, cinematic scene.
Alternatively, the sound effects can be more abstract, like sculpting whooshes, blips, laser sounds, drones, or more to communicate certain moods, themes and scenes to your listeners.
![]()
10. Pitch Shifting and Formant Tweaking
One of the easiest but most slept-on ways to flip a sample is by changing its pitch and formants. This isn’t just about pitching the whole thing up or down. You can get super creative by separating pitch from the character of the sound.
Most DAWs let you shift pitch independently from formants (the tonal qualities that make a voice sound high, deep, chipmunky, or robotic). This means you could take a vocal sample, pitch it down a few semitones, but keep the formants high so it still sounds bright. You could also do the reverse to create more dark and haunting vibes.
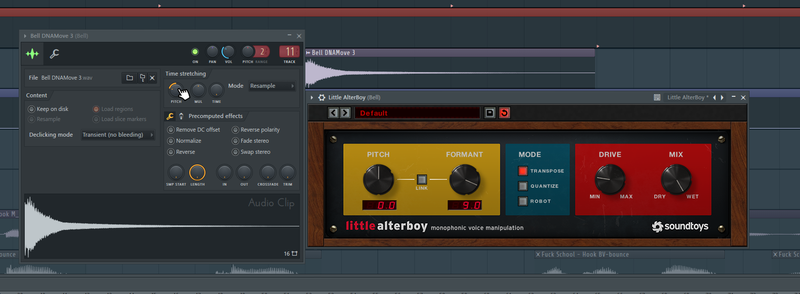
This technique works on everything: vocals, instruments, even percussion. Try stacking multiple versions of the same sample at different pitches and formants to create harmonies, eerie choirs, or strange textures that sound like a whole new instrument.
You can also combine this with reverb, delay, or distortion to give the shifted sample extra depth