Blog
How to Make Samples Sound more Analogue
20 Jul '2025
Discover six ways to get the distorted, lo-fi vibes flowing in your DAW – even if the samples you're using are cold, clinical and just too perfect

Cover Image: Thanh Luu
It seems that we music producers are a nostalgic bunch. Give us ultra-high-res HD audio playback formats, and we’ll go for vinyl. Manufacture a pristine, forward-thinking digital EQ with perfect metering and balance, and we’ll choose a 1960s valve unit instead. Produce the highest-quality audio samples on the planet, and listen to them processed through a lo-fi plugin.
As it turns out, audio quality is only somewhat important, and what today’s musicians care far more about is their sound’s character, flavour and personality. What else explains the popularity of Lo-Fi Music Production and other sonic nostalgia trips?
While Loopcloud can net you all kinds of high-quality audio for use in your music, in this article we’re going to turn our attention to making that audio more rough around the edges, bringing in an analogue warmth that can make anything sound like it’s been cut from an old-time recording studio or run through characterful audio equipment.
What is the analogue sound?
Analogue ‘tones’ or ‘the analogue sound’ have a few possible components. Most often, the following can be audible or somewhat audible in a ‘warm’ analogue recording or sound:
• Hiss or noise associated with older recordings
• Mechanical noise from a piece of recording equipment (tape machine, vinyl record deck)
• Distortion that comes from imperfect (non-linear) audio transfer between a component or device’s input and its output. Distortion can be introduced by many parts of an analogue signal chain – from valves to transistors.
• Saturation is very similar to distortion, and sometimes these two words are used interchangeably. Saturation is the soft clipping of transient peaks in an audio signal, possibly due to overloaded audio gear.
• Wow and Flutter, which are the names for warbling sounds. These are slow (wow) and fast (flutter) movements in pitch of the signal, and they result in imperfect rotation speed of a motor, such as a turning cassette or deck.
• Crackles and Drop-outs are the pops and clicks we associate with vinyl. These are caused by the needle skipping over scratches and dust on the record’s surface, and are most audible during silent parts.
• The compression that is naturally introduced by writing a signal to tape is another component of the analogue sound.
• High-frequency drop-off used to occur in old hardware, meaning analogue sounds have less energy in the highest frequencies (above 5-10 kHz).
• Phase shift and smearing effects caused by analogue filters can be harder to detect but usually have an impact on the sound.
What makes analogue audio sound so good?
Analogue sounds feel pleasant to us, and it’s likely that the reason for this is more psychological than it is physically measurable. People associate analogue style sounds – warbling tones with fewer high frequencies and a higher noise floor – with the past, and we seem hardwired to love nostalgic feelings. Hearing a very high-quality piece of music from our childhood will encourage us to feel nostalgic, too – but it’s more often that the music most people find from their childhood was recorded with a lower quality than modern music is.
How to make samples sound more analogue
Here are six tips for making digital-style samples sound like they were recorded or passed through imperfect electronic circuits.
Add distortion and saturation
Saturation is the process of adding harmonic frequencies to a sound through distortion. Engineers discovered saturation by overloading analogue recording equipment, which creates a pleasing type of soft-clipping, as opposed to the harsh distortion you would get from overdriving digital gear.
In the world of the DAW, saturation plugins digitally distort an audio signal based on the analogue equipment they originally emanated from. There are a few main types: tube saturation plugins emulate the sound of audio driven through tube amps, tape saturation plugins do the same for tape machines and transistor saturation plugins for transistor‑based circuits. All of these saturation types add harmonics to the sound, yet with different characteristics. Tube and tape saturation are more commonly used and sound warm and punchy, whereas transistor saturation has a grittier texture to it.
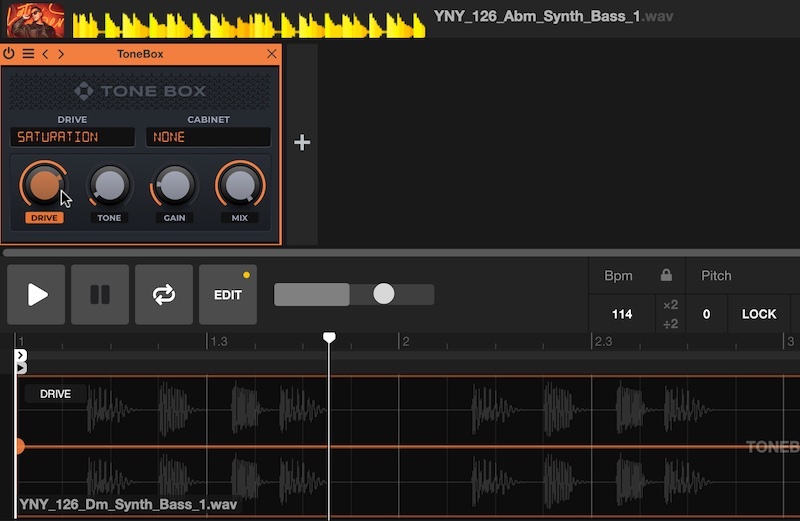
You can add Saturation to your sample before even dragging it out of Loopcloud into your project, if you take advantage of the FX processors available, as in the image above.
Reduce high frequencies
One of the more subtle differences between analogue and digital recordings is an altered frequency response, most notably a slight loss of high end. One reason for this is the inevitable degradation of tape that occurs through use. The reason for this loss of high end is mainly that high frequencies are recorded on the upper part of the magnetic coating on the tape reel, and this part is affected first as the recorded signal wears away. Again, this kind of imperfection is all part of the charm of analogue, and is something you just don’t get naturally with digital recording devices.
The way to emulate high-frequency loss in your DAW is quite simple: it’s an EQ. Use a single high-shelf filter to reduce the gain of the highest band of the sound, as in the image below. However, there’s a caution to take while doing this, as well…
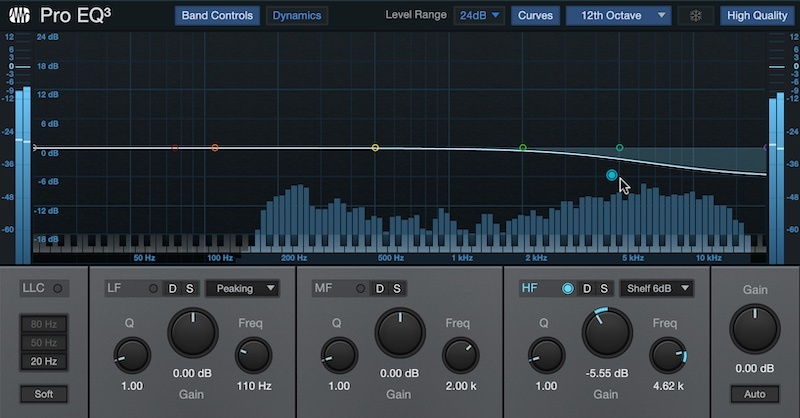
Just because some analogue signals may have less high-end energy, doesn’t mean that you should just reduce the high frequencies of every channel in your mix, indiscriminately. Your source may not have as much high frequency content to begin with.
Perhaps the best way to reduce high frequencies is at the final stage of your mix – on your master output channel. You can reference your whole track’s entire frequency spectrum and compare it to another’s, making a decision about how loud your overall top-end should be.
Make the pitch modulate
In recordings using tape recorders, there are often inconsistencies in the sound due to imperfect equipment mechanics. These irregularities cause fluctuations in the tape speed, which lead to variations in pitch, known as “flutter” or “wow”. Think of these like vibrato effects, with wow referring to slowly modulating pitch variations and flutter referring to quicker rates. Pitch modulation is particularly noticeable on the sustained tones that you will get from keys, strings and vocals.
Perhaps the most reliable way to create custom pitch modulation in your DAW is with a Pitch Shifter plugin, which many will find in their DAW’s stock Audio Effects folder. In the image below, we’re running Ableton’s Shifter effect, modulating its shift by a little bit (that’s the Amount dial) at a very slow speed (that’s the Rate dial).
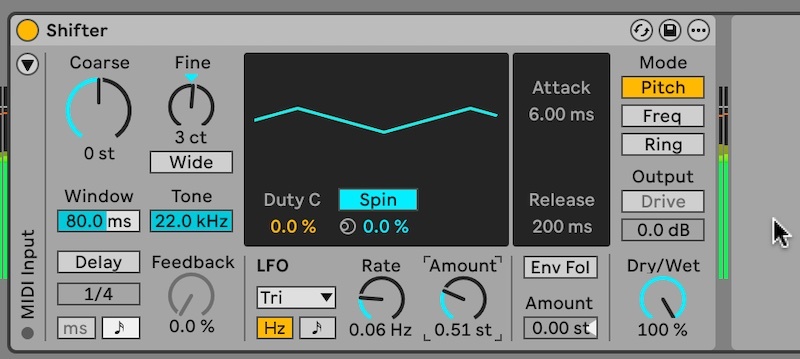
In a pinch, you could also try a Frequency Shifter effect. This is different from a Pitch Shifter, which affects all pitches relatively. A Frequency Shifter multiplies pitch by an absolute value, making the perceived shift vary per octave.
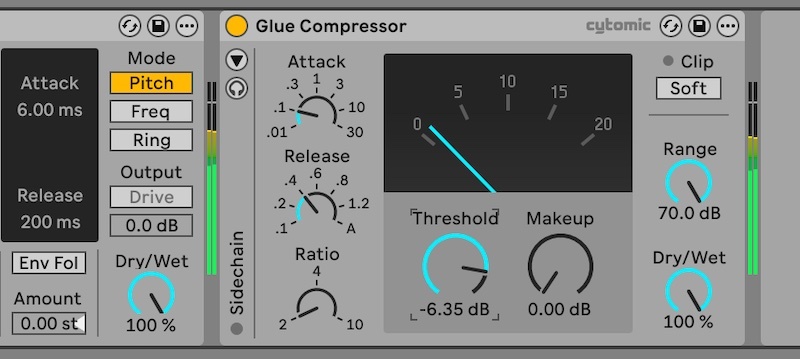
Add some ‘glue’ compression
As we said at the beginning of this article, one effect of recording to tape is a gentle ‘gluing’ compression effect. You can emulate this effect in your DAW with almost any compressor, but we’ll use Ableton Live’s Glue Compressor.
As in the image below, try to use a fast Attack and fast Release, and it’ll likely be more realistic to keep the Ratio low, too, resulting in only a small amount of gain reduction, but one that makes a difference overall to a deeper mix of many channels
Rely on analogue-ifying plugins
If you don’t want to set each property yourself manually, there are plenty of plugins available that can do it for you, many of which are available from Plugin Boutique’s range of Saturation and Tape Emulation plugins.
You can check out more plugin effects that make digital sounds more analogue.
Choose more analogue-style sounds in the first place with Loopcloud
Both Loopcloud and sounds.loopcloud.com let you search for Lo-fi packs and sounds, through both tags and search terms to immediately access sounds that work. And with over four million sounds in total, there’s more than enough here to cover every producer’s needs.