Cubase 6 (and above) allows you to quantize to a groove, where you take the rhythmic feel of one music performance and nudge other parts to more closely match it. The end result allows you to keep some of that magical ‘swing’ or groove in the overall performance, while still getting that ‘locked‑in’ sensation between the key rhythmic instruments in your arrangement.
Cubase includes features that allow groove‑based quantization of both MIDI and audio performances, and this month and next I’ll look at each of these in turn. To illustrate the process, I’ll use a typical example; extracting a groove that I like from a two‑bar drum loop and applying that groove to other key elements of the arrangement, such as a bass line and rhythm guitar part.
Feeling Groovy
Defining the term ‘groove’ is not so easy, but most people would agree that a groove (good or bad!) results from the rhythmic variations a performer introduces into their playing compared to a regular, grid‑based performance of the same notes, and that those rhythmic variations are repeated as a regular pattern. The sense of ‘groove’ can be increased when the player also emphasises (accents) some notes within the pattern.
In essence, then, to obtain the ‘groove’ of a performance we need to extract its regular pattern of both timing (and, in particular, timing that doesn’t fit the regular musical grid that might be set by a metronome) and playing dynamics.

Capture The Feel
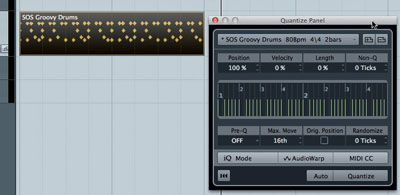
When it comes to capturing a groove from a MIDI performance in Cubase, you actually have very little control over the process: you simply select the MIDI part you want to take the groove from and choose the Edit/Advanced Quantize “Create Groove Quantize” option. If you then open the Quantize Panel (Edit/Quantize Panel), you’ll see your freshly captured groove in the drop‑down list of available grooves at the top of the panel.
Note that, by default, this new groove is given a name to match the name of the MIDI part from which it was taken, but you can edit this to create a more meaningful label. Also note that when you first capture a groove, the name has an asterisk (*) character beside it to remind you to press the save preset button (located next to the drop‑down menu).
Although you can’t change the mechanics of the extraction process itself, there are two significant things you can do prior to the extraction that influence just how groovy your captured groove will be… First, you need to decide where exactly you’ll extract the groove from.
If you only have a short MIDI performance as your source (two or four bars, for example), the choice is simple, but if you have a longer performance (for example, a complete drum performance generated from an electronic kit), you need to decide whether to use all of it or just a selection. Given that one of the key elements of establishing a groove is its repetition, selecting the ‘grooviest’ few bars is probably the simplest starting point.
When you extract a groove from a MIDI part, MIDI velocity and note-length information are also extracted, and, as we’ll see in a moment, you can then choose how much of the MIDI velocity pattern is applied when you superimpose the groove onto another MIDI performance. If you think the original MIDI performance lacks a little something in terms of volume dynamics, then, it’s a good idea to go in and tweak the MIDI velocity data a little, or use the Functions/Velocity options to expand the MIDI velocity range, prior to extracting the groove.
Groove Application
Applying a groove preset that you’ve created to other MIDI parts is very simple and — unlike the extraction process — you get some user control. If you select the MIDI part to which you wish to apply the groove preset, and then open the Quantize Panel, you can select your new groove preset from the drop‑down list. You can then tweak the various Quantize panel controls to adjust just how ‘hard’ you apply the groove quantize to this MIDI part. These controls are described in the Cubase Operation Manual, so I won’t go into too much detail here, but the key starting points are Position and Velocity.
A Position setting of zero percent means that the MIDI notes within the part aren’t affected by the timing of the notes in the groove preset. By contrast, 100 percent means that notes are moved to match the groove exactly. Clearly, you can adjust this setting to taste, depending on how tightly you want the various performances to lock together, and I find that a value of 70 percent is a good starting point for a tighter feel, without taking away all the natural variation within the original performances.
Velocity is also expressed as a percentage value and behaves in a similar fashion; zero percent means that the velocities of the groove preset aren’t superimposed on the MIDI part, whereas 100 percent produces a close match in terms of playing dynamics. Again, adjust to taste. The Max Move setting allows you to place a limit on how far notes can be moved by the quantize process, and the Randomize setting can be used to add just a touch of ‘human’ variation: both are well worth experimenting with.

If required, the Functions/Velocity menu option allows you to adjust MIDI velocity dynamics prior to groove capture.

The Quantize Panel allows you to control how ‘hard’ the groove is applied to other parts. All of these controls are also available via the Quantize tab of the MIDI Editor window.
Once you’ve adjusted these settings, pressing the Quantize button applies them, but you also have the option of engaging the Auto button, which means that settings will be applied automatically as you make changes. Both note‑start positions and velocities will be adjusted.
Because the quantize process is non‑destructive, you can make further changes and repeat this process as often as you wish: you can undo all of the effects of the quantization by pressing the Reset button, located at the bottom‑left of the Quantize Panel. If there are times when you want to commit to the applied quantize, even if only to reduce the likelihood of resetting your perfectly locked groove by accident, Edit/Advanced Quantize/Freeze MIDI Quantize will do the trick.
These bread‑and‑butter groove‑transfer techniques are useful, but the same tools can also be used for more advanced tasks. For example, it’s well worth experimenting with applying a short fragment of extracted groove to the remainder of the longer MIDI performance from which it was taken, to see if it helps (by making the groove feel more consistent) or hinders (by killing the natural variation in overall feel created by the musician).
Alternatively, you can choose just to use a short section of the performance for the various instruments (as I’ve done in my example), and then loop that section, or to retain the whole performance and apply the groove to all of it. Both can work, the former giving greater potential for an ultra‑tight end result, while the latter may produce something with a more natural flow.
Final Thoughts
The example I’ve used to illustrate the MIDI groove-quantize process is deliberately a simple one: a two‑bar drum loop provides the groove that’s applied to other two‑bar loops for bass and rhythm guitar parts, both of which are MIDI based. In a full production, though, things will usually be rather more complex. For example, even if you take the most simple of verse‑chorus song structures, you might experiment with one groove applied to all the song sections or a separate groove applied to each key song section. This is, of course, a creative decision, but Cubase has all the tools you need to do the required experimentation easily and quickly.
Finally, of course, we’ve been working only with MIDI here, but most of us now work with MIDI and audio alongside each other — so next month we’ll look at how you can get both of these locked nicely into the same groove.
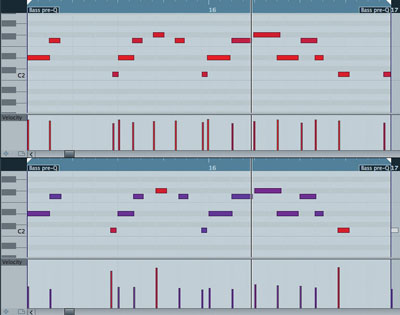
The two‑bar bass line without (above) and with (below) the groove applied. Note the subtle shifts in the starting points of some notes in the lower version and how the Velocity setting has been (deliberately over) used so that three notes are now heavily accented to mirror beats which had emphasis in the drum loop that formed the source of the groove
Original post source here