This short series of quick tips is designed to give you a good overview of the audio processing techniques involved in creating a professional sounding drum beat for use in house, electro and breaks in Cubase. In this part we will look at the kick drum.
Choosing Your Samples
Choosing appropriate samples is absolutely crucial to getting a good drum sound as no amount of processing will correct a sound if it wasn’t right to start with. For this tutorial I have used samples from the Vengeance packs, which I have always found to be great.
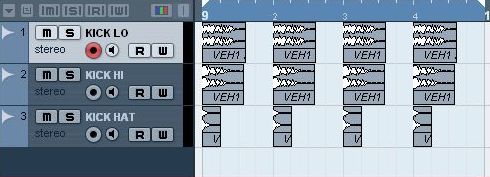
I’m using 3 different sounds to make up the kick drum in this case, one to provide the low end weight, one to add some punch and attack on the top end, and a hi hat sample to add a little extra definition up top.
EQing Your Samples
Now we have our samples loaded in, I’ve layed them out on a track so they sit on every beat like this:
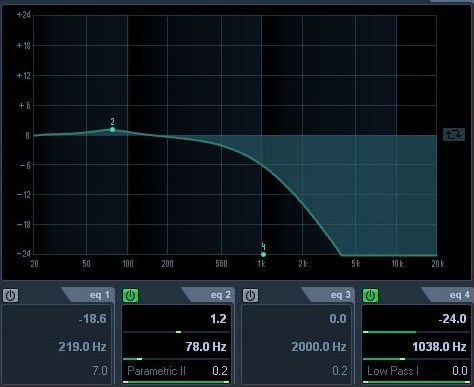
To get our samples to sit nicely together a bit of EQ is necessary. Firstly I will be removing the top end from the Lo, bassy kick. Here you can see the EQ curve I have applied using the standard Cubase EQ, rolling off everything above about 1 kHz with a filter and adding a small boost at 78 Hz to add even more low end power.
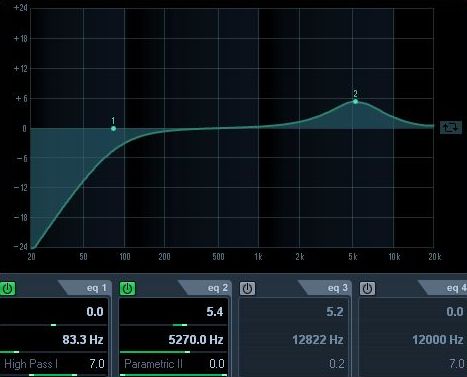
I’ll now do the opposite to remove the low end from the high kick sample. I’ve filtered out everything in the sub range, below about 80 Hz, and added a presence boost at about 5 kHz to help it cut through the mix.
I’ve simply removed the bottom end from the hi hat and turned it down a bit to sit in with the other two kicks nicely.
Applying Compression
Now the drums are all sitting nicely together we can apply some compression to gel the samples together even more, and to help tighten up the sound. In order to get a nice snappy attack and release on my compressor, I am going to use a neat trick outlined in my previous tut which can be found here: Drum Compression: Get Your Attack and Release Times Correct.
For this example I used threshold of -12.6 dB and a ratio of 5.03:1.
The difference is subtle, but you should be able to hear that the second set of kicks sound more punchy and controlled, with less ‘fluffyness’ to them – this will really help them sit in your mix.
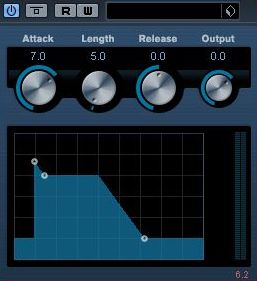
The last bit of dynamics treatment I am going to apply is to use Cubase’s envelope shaper to add a little punch to the attack on the drum. Load in the envelope shaper plugin (found in the dynamics menu) and increase the attack section – you should hear a definite increase in the punch and ‘slap’ of the drum, which will really help it to cut through the mix.
Note: Generally I like to compress before EQing, but in this case it’s simply not possible as the compression is used to ‘glue’ the parts of our kick drum together. If you’re compressing heavily you may well find that you lose some bass energy from your kick, so another EQ on the whole group might be necessary.
Don’t forget to look out for the next part of this series where we will be looking at snare drums.
Original source here

