SampleOne XT is Studio One’s powerful built-in sampler. As well as having all the trappings of a traditional soft sampler, SampleOne allows you to do some cool stuff like recording directly into it and loading multiple samples.
In this guide we’re going to be using the free taster pack of Lo-Fi House 2 from UNDRGRND Sounds.
SampleOne XT quick start guide
Playing samples across the keyboard
Tweaking sample properties in StudioOne XT
SAMPLEONE XT QUICK-START GUIDE
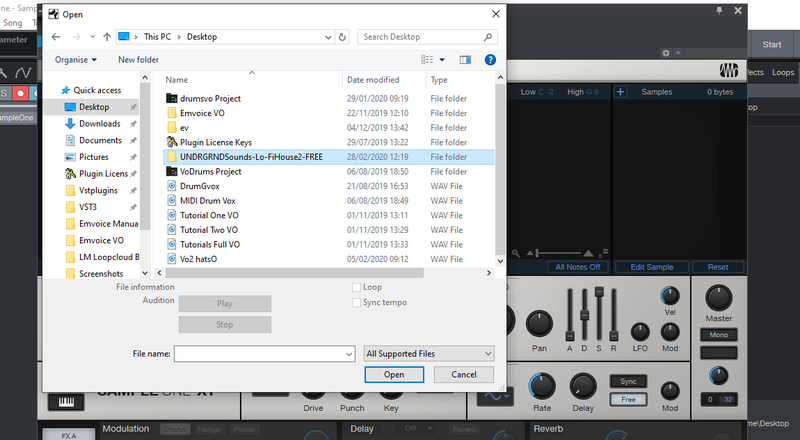
Let’s start by loading a sample from Lo-Fi House 2. In SampleOne we can do this either by dragging and dropping, or by pressing the ‘+’ icon in the top left of the sample window and browsing our system.
PLAYING SAMPLES ACROSS THE KEYBOARD
We’ve loaded the sample ‘US_LH2_Synth_120_bandit_A’. SampleOne does not automatically detect the root note of the sample so we’ll have to do that. The root note is the note of the sample at its original pitch, SampleOne will use this to map the sample correctly to the MIDI keyboard. Above the waveform there is a parameter labelled ‘Root’. Simply change this so the note you play on your MIDI keyboard corresponds to the audio played by SampleOne.
START/LOOP POINTS
To trim your sample simply drag in from either side of the waveform.
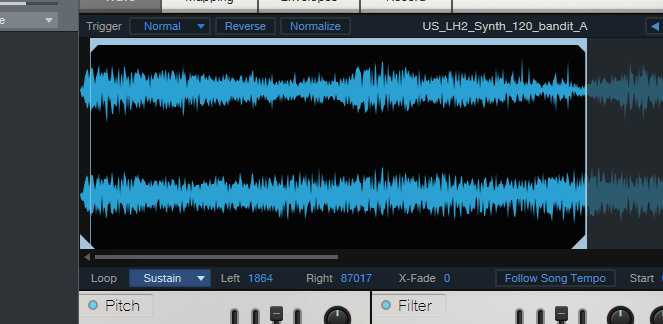
You can loop the sample by selecting a loop mode from the ‘Loop’ drop down menu. Now if you drag in from the top of the cropped sample you will be altering the length of the loop - dragging in from the bottom will still trim the sample.
We’ll go into a little more detail on looping later in this guide.
TUNING SAMPLES
Sometimes samples don’t quite fit in with your song and just setting the root note of your audio isn’t enough. To solve this problem you can tweak your samples in the pitch section using the ‘Transpose’ knob to tune by semitone, and the ‘Tune’ knob to tune by cents.
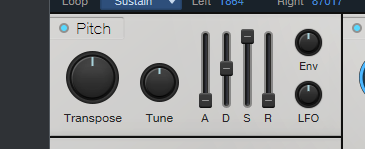
FILTER
SampleOne also has a comprehensive filter section. Here you can adjust the Cutoff and Resonance parameters. There’s also an envelope which we’ll explore later
TWEAKING SAMPLE PROPERTIES IN SAMPLEONE XT
SampleOne XT gives you a whole host of sound design possibilities to help you create any kind of instrument you like.
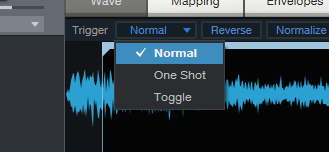
Let’s start with the trigger mode. Above the waveform you’ll find the ‘Trigger’ drop down menu, here you can select from Normal, One Shot and Toggle.
Normal means that the sample only plays when a key is pressed down, One Shot launch the sample and plays it all the way through even after the key is released, and Toggle launches the sample when a note is pressed and then stops playing it when the note is pressed again; the note acts like an on and off switch.
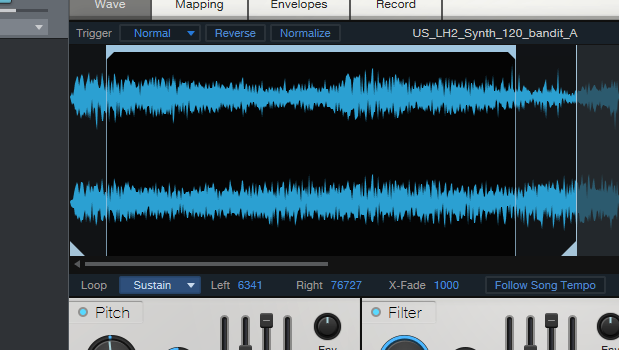
We briefly covered looping earlier, however, SampleOne allows you to go a little deeper than simply setting the start and end point. The Loop drop down menu gives you three modes to choose from: Sustain, Release and Ping-Pong
Sustain means that when a note ends, playback continues beyond the selected loop range until the end of the release phase of the Amp envelope.
In Release mode, when a note ends, playback continues to loop until the end of the release phase of the Amp envelope.
Ping-Pong mode means that the sample plays until the end of the loop area, then the sample is played in reverse to the beginning of the loop area and so on until the note is released.
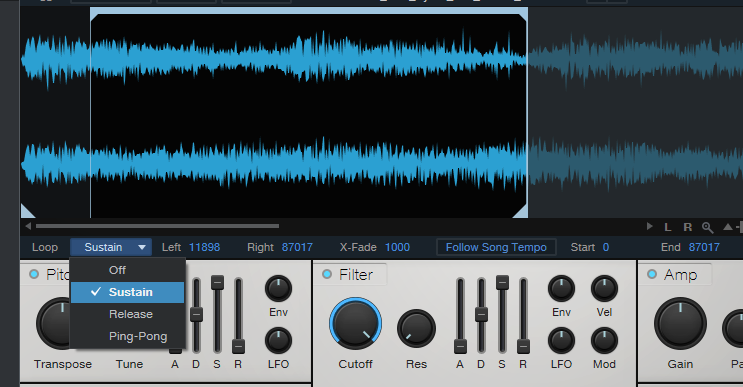
The X-Fade parameter creates a cross fade at the loop start and end points, smoothing the loop and creating a more seamless sound.
You can easily normalize and reverse the loaded sample by activating the ‘Reverse’ and ‘Normalize’ buttons above the waveform.
If you only want your sample to play in a certain range on the keyboard then this can easily be set. To the right of the ‘Root’ parameter there is a ‘Low’ and 'High' option, these will be the upper and lower limits of the keys that will play your sample.
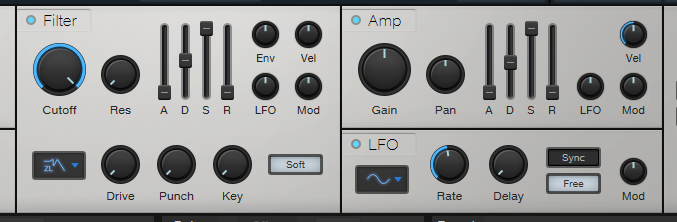
AMP MODULE AND ADSR ENVELOPE
SampleOne’s amp module houses the gain and pan option as well as an ADSR envelope. To get a graphical representation of all the envelopes on the interface, simply open the ‘Envelopes’ tab at the top. Here you will get a visual representation of the envelopes and a different way to tweak them.
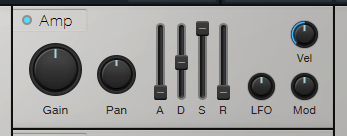
The ‘Vel’ knob changes how much the velocity of a played note affects the volume of the sample triggered. The LFO and Mod knob alter how the gain is affected by the LFO and modulation wheel respectively. We’ll cover the LFO in more depth later.
FILTER MODULE AND FILTER ADSR
The filter module in the SampleOne XT is a standard filter with a couple of extra options. You have your cutoff and resonance as well as a filter envelope. The filter envelope changes the cutoff after a note has been pressed, the amount the filter varies by is set by the ‘Env’ knob. As with the amp section the ‘LFO’, ‘Vel’ and ‘Mod’ dials control how much the LFO, velocity and mod wheel change the filter cutoff by.
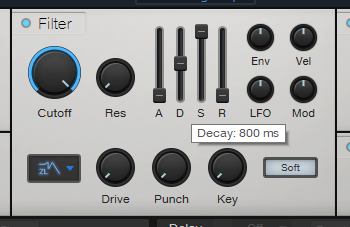
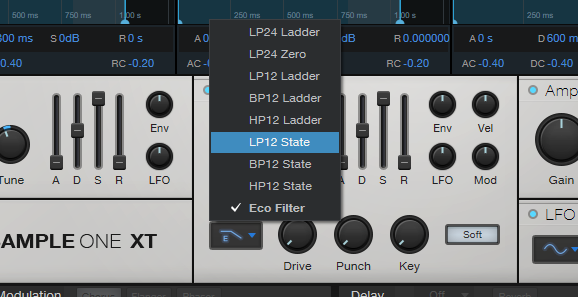
Beneath these options you’ll find a filter type drop down menu where you can choose from various high pass, low pass and band pass filters as well as an Eco filter which uses the least CPU.
To the right of the filter options you can control Drive which adds fullness and saturation to your sound, Punch which adds percussive attack to the start of your sound and Key which means the filter cutoff follows the pitch of the notes you are playing.
PITCH MODULATION
We’ve been through the Transpose and Tune controls, but these parameters can also be modulated by the LFO using the LFO dial in the Pitch section.
Additionally you can modulate the pitch using the pitch envelope. This is a classic ADSR envelope, the amount it affects the pitch of the sample is controlled by the ‘Env’ dial in the Pitch section.
LFO
We’ve talked a lot about using the LFO to modulate parameters, now let's discuss using the LFO itself.
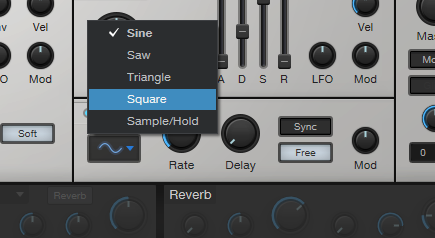
SampleOne XT’s LFO is fortunately easy to understand. There’s a drop down menu to set the LFO waveform where you can choose from Sine, Saw, Triangle, Square and Sample/Hold. Next to that you’ll find the Rate dial which controls the frequency of the LFO, and the Delay dial which controls how long after a note is played the LFO kicks in.
You also have the Sync and Free buttons. When Sync is on then the LFO rate will sync to the project tempo, when Free is on you can set the LFO rate to any frequency.
Finally the ‘Mod’ dial lets you control how much the mod wheel affects the LFO rate.
USING MULTIPLE SAMPLES
SampleOne XT allows you to have more than one sample loaded at a time. This is great for building drum kits or just for layering and blending sounds.
You load extra samples in exactly the same way as you load just one sample, either by dragging and dropping one in or by browsing your system. Once loaded you can set a root note for your new sample and trim and loop it just like you we did with our first sample.
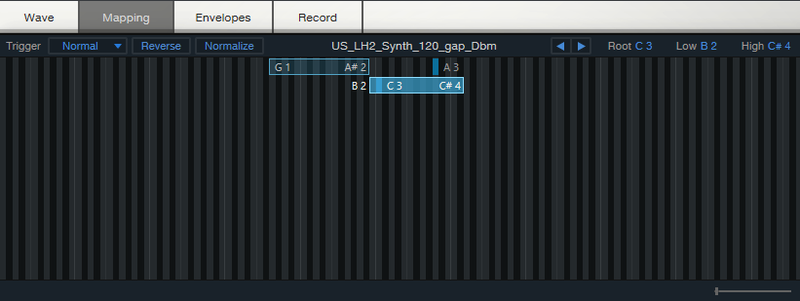
To assign different samples to different keys open the ‘Mapping’ tab. Here you can drap the bars corresponding to each sample so that they cover the keys you want to trigger them. In our example we’ve split the sample across the keyboard so half will play one sample and half will play the other, but you can layer them on top of each other if that’s the sound you’re going for.
The Pitch, Filter, Amp and LFO settings are global and so will be the same for both samples.
ADDING EFFECTS
One awesome feature of SampleOne XT is its built in FX units. This is a godsend when it comes to sound design. Hit the FX button in the bottom left of the interface and you’ll find a Chorus, Flanger, Phaser, Delay and Reverb under FX A and a Gate, EQ, Distortion and Auto Pan under FX B.
We’re not going to explain how each of these works here as they're all pretty standard effects units, however it’s great to have them!
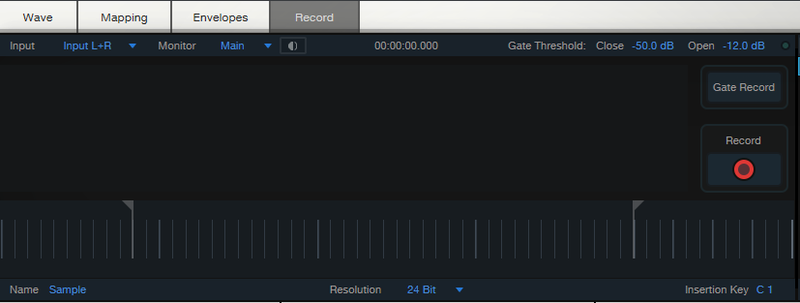
RECORDING SAMPLES
One really unique thing about SampleOne XT is that it lets you record samples directly into it. To do this simply open the ‘Record’ tab, select your input from the drop down menu and hit the big red button! You can then use your recording like any other sample you’d import normally.