Simpler is a powerful, but easy to use stock sampler which ships with all versions of Ableton Live (Intro, Standard and Suite). Though it’s got a small footprint, this versatile instrument has a lot of functionality under the hood.
Uniquely, Simpler employs Live’s warp modes allowing you to stretch samples to match your projects tempo regardless of which note you play. It also has several sample modes which allows you to get really creative with your sampling.
Classic and 1-shot mode allow you to create a filthy bass or angelic pads in seconds using sample packs like Bass House or Chill Pads. You can use slice mode to create some classic vocal chops with a vocal pack like Urban Pop & Vocals 2 in no time at all.
CONTENTS
Simpler Quick-Start Guide
Import a Sample
Start/Loop Points
Playing Samples Across the Keyboard
Tuning Samples
Filter, LFO and Amp ADSR
Using Different Sampling Modes
Sampling in Classic Mode
Using 1-Shot Mode
Editing in Slice Mode
Warp Modes Explained
Advanced Filter Controls
LFO Programming
Pitch and Amplitude Envelopes
SIMPLER QUICK-START GUIDE
IMPORT A SAMPLE
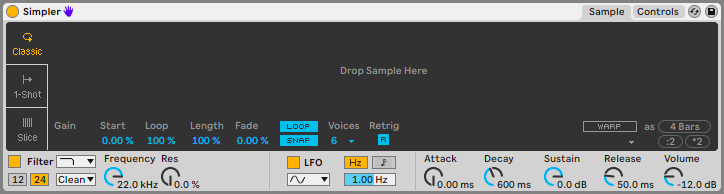
To load a sample into Simpler you just drag and drop your desired sound into the instrument. You can drag your sample from the browser, arrange window or session window.
In this tutorial we’re going to be using the Exmoor Emperor - Celestial Downtempo taster pack which can be downloaded for free.
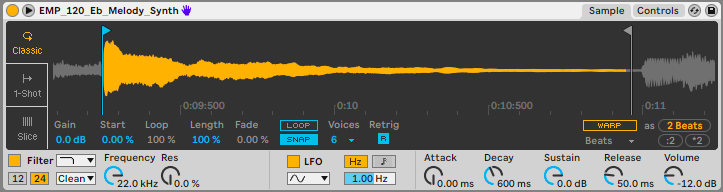
We’ll start by loading the sample ‘EMP_120_Eb_Melody_Synth’. The waveform will appear.

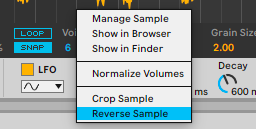
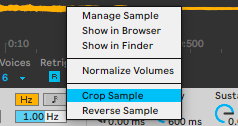
If we want to reverse the sample this can easily be done via the right click menu.
START/LOOP POINTS
This sample is a long loop, but we want to cut it down to just one note so we can use it as an instrument. This is easily done by trimming the sample. By dragging the handles at either end of the sample you can crop it to the desired length. To make sure you crop the sample accurately you can zoom right in to your waveform.
To guarantee you don’t get any unwanted clicks or pops at the beginning or end of your sample, make sure the ‘SNAP’ button is activated. This means that the sample automatically crops to the nearest zero crossing. To permanently trim the sample you can select ‘crop sample from the right click menu.
PLAYING SAMPLES ACROSS THE KEYBOARD
Now we have a sample loaded and trimmed in Simpler we can start making music! Play a few notes with your computer or MIDI keyboard and you’ll find you’ve got a pretty nice sounding instrument.
However, it’s worth noting that the note you play on your keyboard won’t necessarily relate to the note that Simpler plays. This is because Simpler automatically selects C3 as the root note, even if your sample isn’t a C. Luckily this is easily fixed.
TUNING SAMPLES
By opening the ‘Controls’ tab in the top right of Simpler you can fine tune the pitch of your sample. Here, below the pitch envelope, you will find the ‘Transp’ (transpose) and ‘Detune’ parameters. By adjusting these you can make sure your sample matches the keys you play.
Top tip: if you load Ableton’s Tuner after Simpler in the effects rack you can tune Simpler just like a guitar!
FILTER, LFO AND AMP ADSR
In the ‘Sample’ tab, beneath your waveform, you’ll find basic filter, LFO and amp ADSR controls.
The filter controls allow you to adjust the filter type, the rolloff and resonance. Additionally you can select one of several filters modelled on classic analogue hardware. These also give you the option to add drive to your sound.

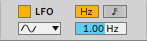
To access the full power of the LFO you’ll have to open the ‘Controls’ tab, we’ll cover that in more depth later. From the ‘Sample’ tab you can alter the LFO shape, rate and whether it syncs to the tempo of the project or not.
The amp envelopes are standard with a knob for Attack, Decay, Sustain and Release and a Volume parameter to adjust the gain of your sample.

USING DIFFERENT SAMPLING MODES
Simpler is unique in that it allows you to choose between three different sampling modes. You can change which mode you’re using via the options to the left of the waveform. We’ll cover each sampling mode here, starting with Classic
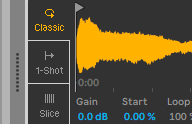
SAMPLING IN CLASSIC MODE
When a sample is dropped into SImpler it will automatically load in Classic mode. Classic mode allows you to construct a polyphonic sampler instrument and is the only mode which allows you to loop samples.
Looping samples is great for creating pads and synth leads as it allows notes to play indefinitely. To create a loop with Simpler you must first activate the ‘LOOP’ button. Now you can adjust the various loop parameters. ‘Start’ adjusts where the sample is triggered from when you first play it, it does the same job as cropping the sample; ‘Loop’ sets where the loop will play from each time the sample loops; ‘Length’ determines at what point in the sample Simpler will loop back to the point determined by the ‘Loop’ parameter; ‘Fade’ will apply a crossfade to the looped sample, smoothing the sound.
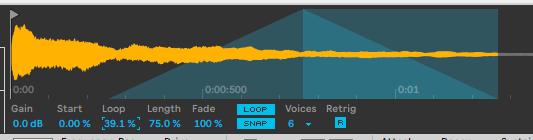
In our example we’ve created a smooth organ type sound by looping the tail of our sample with a long fade.
You can set the number of voices of your Simpler instrument via the drop down menu and enabling the ‘Retrig’ button means that the amp envelope will retrigger every time a note is played.
As with every other sample mode you can select a warp mode too. We’ll cover this in more depth in the Warp Mode section.
USING 1-SHOT MODE
1-shot mode is a basic monophonic mode which is ideal for drum sampling or basslines. There’s no looping functionality here so it’s not ideal for pads or leads.
The only controls you get are ‘TRIGGER’ and ‘GATE’ mode. These effects what happens to the sample when you release your keyboard key. When ’TRIGGER’ mode is on the sample will play all the way through as soon as a MIDI note is played, even if the note is released, until another note is played. ‘GATE’ mode will only play the sample whilst a MIDI note is being played.

EDITING IN SLICE MODE
Slice mode is excellent for creating UKG vocal chops or slicing up breakbeats. It analyses your sample and slices it up into mini samples, assigning each one to a different MIDI note. We’ve loaded a beat loop called ‘EMP_135_Acousta_Drums_Full_1’
Like in 1-shot mode you can choose between ‘TRIGGER’ and ‘GATE’ mode. You also have the ability to select how the sample is sliced via the ‘Sliced By’ dropdown menu.
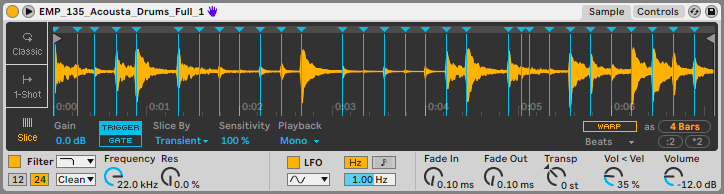
‘Transient’ mode will analyse the sample and slice it at each transient, you can adjust the sensitivity to change how small a transient has to be to be a slice point. ‘Beat’ mode slices the sample at each beat division, you can change the division value from the ‘Division’ drop down menu. ‘Region’ divides the samples into an equal number of regions, again the number of regions can be changed via the ‘Regions’ menu. Finally ‘Manual’ mode lets you place your own slice points.
WARP MODES EXPLAINED
Ableton’s Warp modes are one of its strongest assets and Simpler comes with them built into its UI. Warp mode stretches samples so that they fit the tempo of a track no matter their original speed. This is great for sampling because it means that pitching samples up won’t make them really short or vice versa when pitching samples down.
There are several different warp modes.
Beats works best for drums or other audio clips that have strong transients. It slices the sample up and then repeats each slice depending on the ‘Mode’ and ‘Env’ settings you choose. Under the preserve menu you can choose how Warp mode determines where the beats fall.

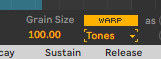
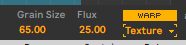
Tones mode works best for samples with clear pitch structure like vocals. The ‘Grain Size’ allows you rough control over the average grain size used.
Texture is great for creative sound manipulation as well as working with polyphonic sound sources. You can use the ‘Flux’ setting to add randomness to the Warping process.
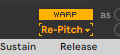
Re-pitch causes simpler to act like a traditional sampler, simply speeding up or slowing down the clip to pitch it up or down.
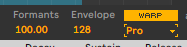
Complex and Complex Pro mode combine elements of all the other warp modes and as such are great for entire tracks which combine, beats, melodies and polyphony. However, they both require a lot more CPU than the other modes. It's worth freezing tracks that use it.
The formant setting in Complex Pro mode determines how well formants are preserved when transposing. This allows you to maintain the tonal quality of a sound even when massively repitched. The envelope setting can be left alone for most samples but can be adjusted for taste.
ADVANCED FILTER CONTROLS
You can get a lot of control over Simpler’s filter under the ’Controls’ tab. Here you get a graphical representation of the filter and control over a few more settings.
You can keytrack the filter with the ‘Key’ parameter so the cutoff frequency adjusts with the pitch of the notes you play. Additionally the ‘Vel’ setting causes the cutoff to vary with the velocity of the notes played.
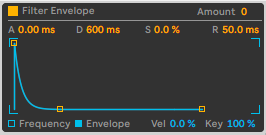
You can also adjust the filter envelope which controls the cutoff once the notes have been pressed. This works just like a normal ADSR envelope with the ‘Amount’ determining how much the envelope effects the cutoff by.
LFO PROGRAMMING

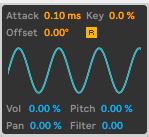
You can assign the LFO’s modulation destinations in the Controls tab too by setting the percentage of the ‘Vol’, ‘Pitch’, ‘Pan’ and ‘Filter’ parameters. Additionally you can set the Offset, Attack and Keytracking of the LFO as well as toggling Retrigger off and on.
PITCH AND AMPLITUDE ENVELOPES
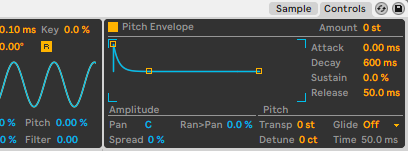
The amp envelope also has a visual representation under the Controls tab with a few extra controls above it. Most importantly you can set the trigger mode, determining whether the envelope repeats or not.
There’s also a pitch envelope which allows the pitch of the sample to change over time depending on the ADSR and the ‘Amount’ you set.
GLOBAL PROPERTIES
Here you’ll also find the more basic global controls such as Pan, Spread, Transpose, Detune and Glide.