Don't waste valuable music-making time finding your way around the latest version of Ableton's venerable DAW. Liam O'rsquo Mullane gets you introduced in this Ableton Live mixing and workflow tutorial.
Many years in the making, Ableton Live 9's new features list has already done the rounds in our news section and on the web, and when we got our hands on the beta version and started making music with it, it didn’t take us long to notice some great new mixing and workflow refinements.
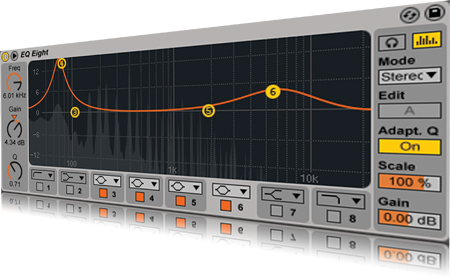
Some of these changes are major – such as the new incarnation of the EQ Eight and Live 9 ‘s dynamic devices – while others are much more discrete. So discrete, in fact, that you appreciate them only when used in practice. We therefore did the legwork for you and had a good look around, bringing you some highlights here. To begin with, let’s take a look at the very root of all workflow: Live 9′s new file management system.
Getting Started
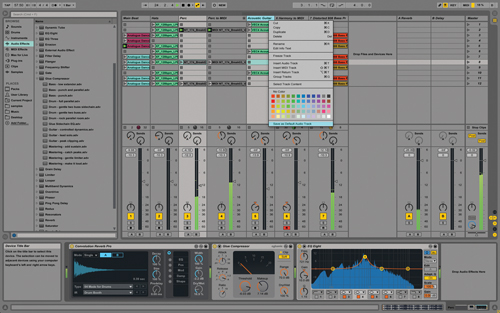
Ableton’s approach to screen layout has always been to keep it simple – a single fixed master screen with non-moveable windows that surround the main sequencing area. The Device View Selector window is a fixed size and the Clip Overview window at the bottom of the screen can be re-sized only vertically, but this is perfectly fine to work in.
Something that has always been a little restricting in previous Live incarnations, however, is the Browser. You used to be limited to using dedicated File Browser tabs for quickly accessing specific parts of your hard drive. The first of these would normally be left in its default location within Live’s own library, so in reality it was actually two not three tabs available for your personal setup. Although bookmarks could be set up for your preferred locations, they had to be accessed via a drop-down menu, so it wasn’t a lightning-fast procedure.
In Live 9 the entire browser has been re-designed, so along with the expected tabs for Instrument, Audio, MIDI devices and third-party plug-ins there’s also Sounds, which you can search to find what you want rather than having to go via the Live devices they were created with. Use this when you know you’ll need specific sonic elements, such as a pad, for instance. It also helps to minimise the time spent learning Live’s library content.
If you’re very specific as to the type of source you’re after, use the tabs labelled Clips and Samples, which are useful for choosing pre-prepared audio or audio on your drive. Be aware, however, that Samples will display all samples contained in any location added to Live’s Browser, but the search box at the top helps to narrow down the options available. The shortcut is [Ctrl]/[Cmd]+[F] (PC/Mac).
In terms of adding your own preferred locations, the new Add Folder option enables you to add them to the same fixed panel in the Browser as for all other elements already mentioned. Folder management is now a lot easier to deal with too, as other folders close when you open a new one. This and the separate Browser labels for Instruments, MIDI and Audio Devices makes navigating your tools much easier as you create or mix. It also negates the need to scroll up and down when the list gets too long due to multiple folders being open. This behaviour can be overridden if you prefer by holding down [Ctrl]/[Cmd] as you open a folder (useful for keeping go-to presets to hand when mixing and so on). Another way to keep this type of workflow available is to make use of the new defaults option for Audio and MIDI Tracks. This enables you to store preferred devices or plug-ins on a track.
Two Into One
The relationship between Live’s two primary views has improved quite a bit in Live 9 – certainly, Session and Arrangement views are now much better integrated than before. You’ll notice the benefits during those moments when you want to take a group of musical ideas or song sections in Session view and turn them into an arrangement in Arrangement view, or take an already laid-out song arrangement and move it into Session view for a live performance. For both tasks, automation for Session Clips is a welcome feature, one that’s been very high on the Live user’s wish list for many years. It’s a slightly different process from recording automation in Arrangement view as you need to enable a new Automation Arm button for session capture, then a Session Record Button when you’re ready to go. Sadly, neither of these has dedicated shortcuts like Live’s transport controls, so use Key Map mode ([Ctrl]/[Cmd]+[K]) and assign them to your preferred keys.
When you move these Session clips to Arrangement view they behave just like a clip would if it originated from Arrangement view. It’s worth pointing out here that this capture can take place in one of two ways, set within the Record Warp Launch panel in Preferences. One captures parameter changes wherever they happen; this is called All Tracks. The other is much more like recording MIDI control of a specific instrument; this is called Armed Tracks. As the name suggests, you have to manually arm the track you want to record Session automation to.
Another improvement to Arrangement-to-Session workflow is the Consolidate Scene To Time function. All you need to do is select the area of an arrangement you’d like to move into a scene and right/[Ctrl]-click to select the function. If you’ve tried this before you’ll remember that it used to involve highlighting the area and selecting Split to create a clean section of clips, which you then had to drag to Session view. In itself this was quite a simple process, but you would also need to Consolidate sequenced pieces of audio on one track so they became a single clip that looped in Session view. The new approach saves quite a lot of time and all new clips are looped automatically.
Fix In The Mix
The last new element we’ll explore is the Audio To MIDI functionality, using it as a basic interface for creating rhythmic or musical parts. Start by recording yourself beat-boxing or singing and begin creating a track without any note programming or MIDI controller input.
Its potential as a remixing tool should also not be overlooked, enabling Live to transcribe parts from a track to use with your own chosen drum or melodic sounds. Both are remarkable features, but we tried it for sound replacement and layering while mixing. For example, if you’re mixing a track for someone else, you may have the parts only as audio, and if an element is letting down the mix you can use these tools to add the necessary sound(s) to improve them as needed. This facility makes mixing work with audio a bit more flexible.
Extract Drums To New MIDI Track works very well on anything with clear transients, but we find that a little additional processing prior to conversion helps Live to pick out more subtle drum hits in certain breakbeat sources that might not be as defined as you’d like.
First we add a Gate device, setting the Attack, Hold and Release to very short values while the Threshold is set to only tickle the gate open. It doesn’t need to sound good at this point, you just want the gate to open for all the drum hits you think are in the audio. Try using the EQ for the Sidechain section on the Gate to hone in on the most dynamic part of the frequency spectrum if you don’t initially get the results you’re after, but be sure to Extract Drums after flattening your newly gated sound using Freeze and then Flatten from the right/[Ctrl]-click menu. You have to do this because the conversion process listens to the audio clip rather than any subsequent processing.
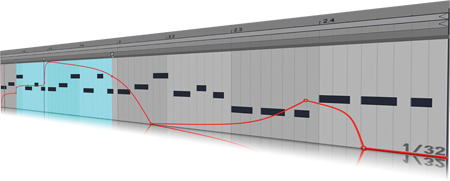
Extract Harmony To MIDI is for working with polyphonic material, and if it’s melody-dense there are a couple of tricks you can try to optimise the results. We found that adding a simple high-pass filter to remove the lower, body frequencies of the sound helps Live to detect smaller, flourish-like notes. If problems still persist you can use additive EQ to raise the volume of the notes in question to help Live out a little bit more.
Of course, we’re only scratching the surface of what’s new in Live 9 and needless to say we’ll be bringing you more tutorials and features in upcoming issues and here at MusicTech.net, so stay tuned and stay ahead of the game!