Even though Ultrabeat is almost 10 years old, it's still not widely understood by most folks who adopt Logic Pro as their new DAW of choice. Its esoteric design, large interface, and unique approach to drum designing left most reaching for something they were more familiar with.
However, Ultrabeat was one of the new features that I was most excited about when Logic 7 was announced. Folks were worried that Apple would get it wrong (having recently been acquired from Emagic, some were uneasy if Apple could handle pro audio well!) and Logic 7 really cemented that they had it under control.
Even with Logic Pro X, Ultrabeat remains an unchanged staple in the product line, and makes it even more worthwhile to jump in with this Ultrabeat tutorial and figure out how to best use it for your own workflow!
1. Take A Look Around…
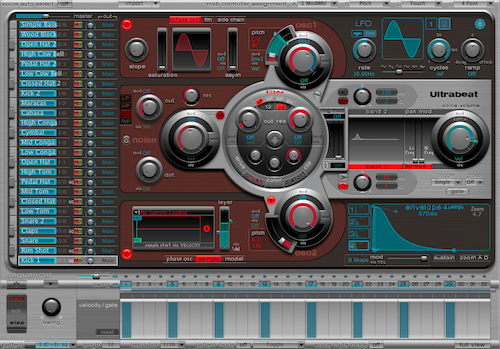
The first thing we see when we open up Ultrabeat is three major panels. The left, where each single drum shot resides against a traditional MIDI keyboard lay out (up to 24 “voices,” we’ll talk about the 25th voice later.) The center, where you can find two oscillators, a filtering section, noise control, envelope, LFO, and EQ. Lastly, the bottom panel consisting of a familiar looking step pattern sequencer.
*Tip: Make sure you explore the step pattern sequencer’s full view, via the “full view” button on the far bottom right!
2. Starting With Samples.
One feature that makes Ultrabeat unique is its ability to combine a synthesis engine (it’s Phase Oscillator) with a single shot sample. However, this can get a bit intense at first, so let’s think of Ultrabeat as a sampler for now. To do this, we simply leave Osc 1 in its off position and move to thinking of Osc 2 as our primary “engine.”
In Osc 2, move to the “Sample” button to change its role from synthesis to sample playback. Load samples via the top pull down, use the MIN and MAX sliders to dictate the velocity sensitivity start points for a hard velocity vs. a soft velocity.
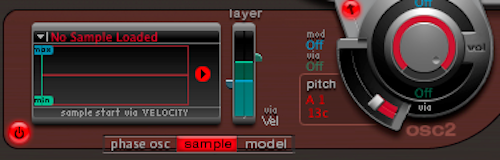
Follow the pitch slider and volume knob for an on/off arrow allowing you to send Osc 2 up to the filter. Here you’ll find standard filter settings, along with a bit crusher and overdrive “coloring.”

Adding noise can be a great way to “shine” up a hi hat or white noise crash, and EQing on the right can allow for quick sculpting of your sound. Experimentation is the best way to learn how all these will effect your sound in good (and bad!) ways.
*Tip: Make sure you use the envelope section to control the sustain of your sample. If you are loading a long cymbal crash sample, and noticing the sustain is quite short, adjust envelope 4, which acts as a somewhat global envelope in Ultrabeat.
3. INIT Is A Great Starting Point!
To really learn any synth, starting from an ‘init’ patch can be very helpful. Ultrabeat is no different. Every voice in Ultrabeat can be reset to a variety of start points, to do this simply control + click (right click) on a voice, and find the init menu.
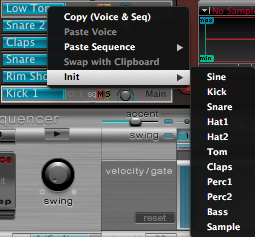
Choose from a variety of start points, including Bass, and Sample! Choose Sample to clear the voice of ALL Ultrabeat filtering and tone adjustments, this will allow your sample of choice to play back exactly as you hear it in the finder.
A shameless plug, but in my latest Ultrabeat drum library you can find a full init kit, all ready set up and ready to add samples to without the hard work of clearing out all 25 voices!
*Tip: Voice 25 (at the very top) is a voice reserved for melodic content. Playing this voice you will find that it transposes the sound from C3 and above on your keyboard, allowing you to add melodic counter points to your rhythm patterns all within Ultrabeat.
4. Pan Spread Mode!
A great way to add a bit of dimension or movement to a drum voice lies within Ultrabeat’s pan mod and spread parameters, located to the left of the large voice volume knob.
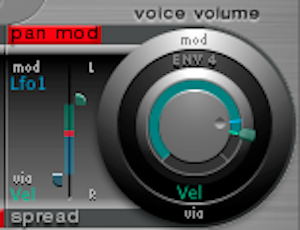
Pad Mod utilizes the LFO’s to move the voice between the left and right speaker, depending on the width you decide with the L and R sliders.
Spread simply breaks the drum voice into a lower and higher bands, which via the correlating sliders allows you to displace the voice within the stereo field. Highly useful for stylistic drum kits, sound FX kits, or anything that just feels too narrow.
5. Pattern Sequencer Basics…
Once you’ve started to make some drum sounds, you might be keen on using the step pattern sequencer. Folks familiar with hardware drum machines, Reason, and other step based sequencing can rely on their existing knowledge for easy beat making.
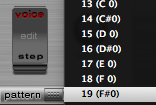
Patterns are stored on MIDI key notes, look to the pattern pull down to see what keys have patterns on them (noted by a “SQ” to the right of the listed key). To clear a pattern to make your own, simply control + click (right click) on the pattern and select “clear.”
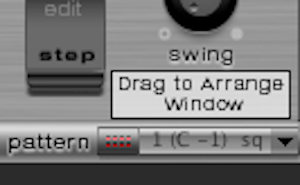
Once you’ve built your pattern, you’ll need to add it to your project’s arrangement. The small dotted box to the left of the key label needs to be clicked, held down, and dragged and dropped into the Ultrabeat’s arrangement track. When you mouse over this box, Logic will provide a tool-tip indicating this is what needs to be dragged to your arrangement.
Alternatively, you can “play” each pattern by recording a performance on your MIDI keyboard, cycling through the pattens you created.
*Tip: Once you are done with your pattern, and you’ve brought it into the arrangement, make sure you turn OFF the sequencer! Both the arrangement and sequencer will trigger each drum voice, causing the volume to overload and/or be perceived as louder than you originally created the sound!
—-
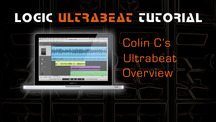
Colin C. is a Los Angeles based producer, engineer and certified Logic Pro trainer based out of his own Cell Studio. He’s also the creator of two Logic Pro essential products for Loopmasters; “Mix Essential Channel Strips” and the brand new “Ultrabeat Electronic Drum Kits.” Colin’s original compositions and remixes can be heard on HBO, Showtime, Fox, and MTV. He has released over 60 productions on various labels worldwide.