
In this step by step guide you’ll learn how to create high quality audio mixdowns of your Reaper projects. This is written for new Reaper user with the objective to produce renders suitable for audio mastering.
Step 1
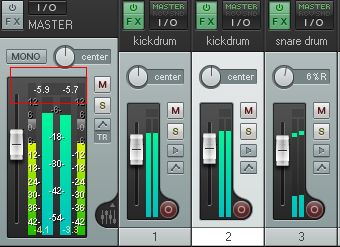
Complete your mix first and make sure it is final before doing the rendering. Leave some headroom for mastering somewhere around -6 dB to -3 dB maximum peak. You can observe this in the Reaper master level meters such as shown below. In the screenshot a peak level of around -6 dB has been shown. Take note that this is the maximum peak from the start to the end of the song. You are going to confirm this in Step 9.
Step 2
Select the portion of the mix you would like to mix down (from the start to the end of the song). To do this, you need to left click – hold and drag with your mouse (at the time area section which is above the first waveform) to the last part of the song. By dragging, it will highlight the selection.

Step 3
Check what sample rate and bit depth you used during recording. This assumes you are using Reaper to record your tracks. You can see this in the upper right-hand of your screen in Reaper. For example, in the screenshot below it shows that it is set to 24-bit / 48 kHz.

Step 4
Go to File – Render. You will then see the ‘Render to File’ menu. First, set the following:
- Render:Master Mix
- Render bounds:Time Selection
- File name: The desired file name of your mix down. Make it descriptive such as‘SongTitle-Mixdown’
- Directory – this is where the rendered file will be saved. Take note of this.
Step 5
Next in the ‘Render to file’, you need to define the sample rate, bit depth, etc required for the mix down. Set the following:
- Sample rate =’48000′(this should be same with the sample rate used in recording as determined in Step3)
- Channels:‘Stereo’(this is usually stereo since most audio for commercial music production are in stereo format).
- Output format:‘WAV’(this is a common format)
- Bit depth: Set this to’24 bit PCM’(the same with the recorded files as confirmed in Step3).
- Leave other settings at default (e.g. setting to‘Full-speed offline’and Resample mode to‘Better’
The purpose of doing the above settings is to leave sample rate conversion, noise shaping and dithering to the mastering engineer for best results.

Step 6
Close all running programs in your computer except Reaper. Click the button ‘Render 1 file’. This will start rendering the file into a single waveform. You can locate this file in the output directory you have set in Step 4.

Step 7
Save your mix with the changes and then go to File – Close all projects. Load the rendered file in Reaper by going to Insert – Media File.

Step 8
Re-confirm the waveform statistics in Reaper by clicking FX button then go to
‘JS: schwa/audio_statistics’
and then click OK. The values are still zero because the audio is not played.

Step 9
Play the mix down/rendered file from start to end. You will get the statistics. Some mastering engineers do require peak levels (left and right) to be within -6 dB to -3 dB, so make sure the rendered file stats is OK.

Step 10
You do not need to apply further compression, reverb, EQ and other effects to the rendered/mix down. Leave this to the mastering engineer. You can zip the final wav file and send that to your mastering engineer. Zipped file is convenient and easy to transport.
Original Source here.