In part 1 of this series Mixing Bass in Pro Tools, I talked about common bass problems. In part 2, I gave you some tips for EQ-ing bass. Today we need to take a look at how to use compressors and limiters to properly handle bass.
I’m writing this with the assumption that we all have a good basic understanding of what compression does. I want to look specifically at how we can utilize compression to make our bass parts better.
Does the bass need dynamics?
This is a question worth asking. Do we need the bass to have a huge volume range? Or do we want to tighten down and make it very one-dimensional, with every note being the same volume?
If you’ve hung around HSC for very long, you probably think I’m going to pick the first option. But I actually think that the less dynamic range the bass has the better.
When mixing a pop/rock song, where you’ve got the typical bass, drums, guitars, etc., there’s one thing you want to be constant – your bass tone. If each note the bass player plays is at a dramatically different level than the next, you’ll end up with sections of the song where the bass just seems to disappear. In other sections, though, it will be overwhelmingly loud.
What to do?! Compression to the rescue.
Let me just say that this doesn’t apply to every bass part ever recorded. If you’re doing a jazz tune, you probably don’t want to slam the upright bass with a ton of compression. (Heck, you’re probably not gonna use much compression at all on a jazz track.)
However, if you’re mixing a pop/rock song (or if you think you’ll ever mix one in your life), read on.
The Purpose of Compression
For most instruments, I use compression to change the tone. I’ll use it to make a vocal more “up-front,” or I’ll use it to bring up the sound of the room on drum overheads.
With bass, though, it’s different. While compression does have its tonal effects on bass (like bringing out pick noise and increasing sustain), I primarily use compression to even out all the notes.
Ideally, every bass note in the song will sound exactly the same, perfect consistency from note to note. That’s one of the things we look for in a bass player, right? They play consistently.
We want our bass part to be heard and felt on every beat of the song. Therefore, we need to employ compression and limiting to make the notes as consistent as possible.
How I Set Up Compression/Limiting on Bass
Rather than go on and on writing about the various implications of using compressors and limiters on bass, let me walk you through how I set things up for my sessions.
After EQ-ing the bass, I’ll add a compressor. (I EQ the bass first because I want to get rid of any unwanted frequencies. A compressor will make these frequencies louder, so you want them to be gone before you compress.)
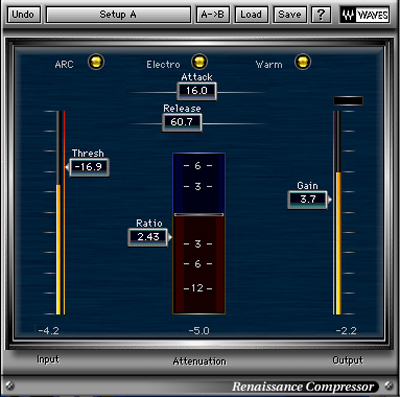
Here’s a screenshot of one compressor setting for a mix:
There’s not a ton of compression going on here. I try to use a longer attack time, so the transients still come through. The purpose of the compressor in this example is to bring up the overall volume of the bass, particularly the sustained notes.
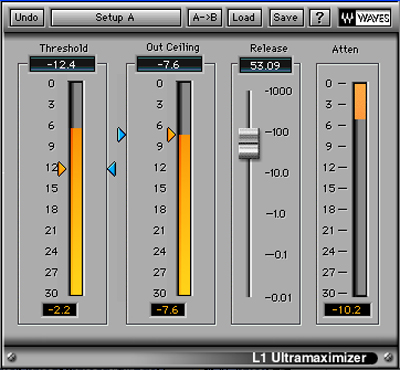
After compressing, I’ll put a limiter on the track. The limiters job in this instance is to completely squash the bass, preventing it from getting any louder.
You’ll notice that the threshold is about 6 dB below the ceiling. That difference is bringing up the overall volume of the bass. The ceiling, though, is preventing that volume from going past -7.6 dB.
This makes every bass note almost exactly the same volume. Bringing that output ceiling down allows me to control the output volume of the bass. Bringing the threshold down throws everything that comes through the limiter up to the ceiling, where it is prevented from getting any louder.
If you’ve never used a limiter before, this can be a bit confusing. However, once you understand what’s going on here, you’ll realize that a limiter can be a useful tool for more than just squashing your entire mix.
I don’t use this technique on every song I mix, but hopefully I’ve given you something to think about and experiment with next time you’re in the studio.
Original source – here.


