
The biggest and most difficult sound to get right in the studio is, usually, the drum kit. There are many factors involved — the kit is made up by an assortment of instruments, usually with individual mics on every drum, and then room mics on top of that. This makes for a difficult job and usually the part of the tracking process that consumes the most time. Especially in home studios where the acoustics and mic selection don’t really cut it, additional processing is required to improve the sound. Let’s take a look at improving the kick sound with sine waves.
People spend ages pondering on how to get that kick drum sound. They want the big fat boom that they can hear on records, but can’t recreate it themselves, and not for lack of trying... I have a trick that can help make your kick drum all that much fatter, resulting in a sound you can use for tight, throbbing, pile-driving rock, or for fat hip-hop beats. I’ll be using Logic Pro 8 in this tutorial, but any decent DAW will produce the same results.
When you have your kick drum recorded and you’ve spent hours trying to squeeze out a fatness that isn’t there, maybe you can use artificial tricks to enhance the kick drum sound. Enhancing the low end by adding a sine wave generated by your DAW’s oscillator is a great way to add thump and boom to your bass drum track, whether it be rock, hip-hop or whatever genre you choose to make.
A sine wave is the most simple sound wave you can find, representing only the fundamental frequency you choose — in this example, 50 Hz. It doesn’t include any harmonics, unlike the square or sawtooth waves. So by adding a sine wave to the kick drum we will only be adding one tone, and not a musical element or characteristic.
Step 1 – Get Your Original Kick in Good Shape
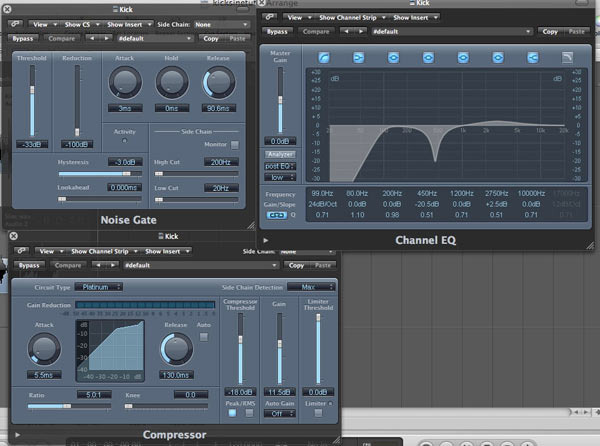
You have your kick drum track EQed, gated, and compressed however you like it. Get your kick sound the best it can be before following the rest of this tutorial, because the sine wave is only going to enhance the bottom, and is not a character in itself.
I gated mine to get rid of the snare sound bleed and most of the hi-hats. I compressed it moderately (for rock) and EQ'ed it to enhance the click, and cut-out the boxiness. I also filtered it quite high because I thought it sounded better when I added the sine wave later on. Always think of the sound as a whole, not two sound sources that sound great individually but clash when they are together.
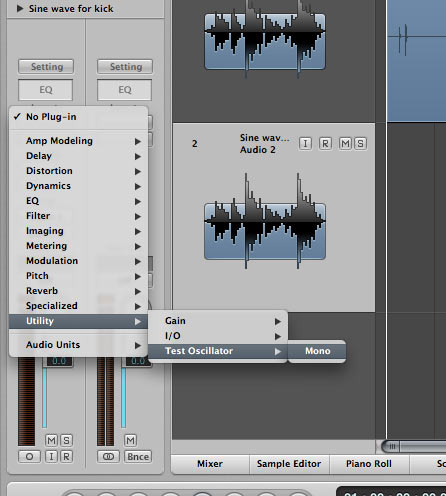
Step 2 – Make a New Track for the Sine Wave
Add another track below the kick drum. Name it “Sinewave for kick.” We won’t actually be putting any audio into that track, but rather putting a test oscillator on the inserts.
In Logic, you can find the test Oscillator under Utilities > Test Oscillator > Mono.
Step 3 – Make Your Sine Wave
Next step is to make a 50 Hz sine wave, continuously playing on the track. On the 'Test Oscillator' there are many functions, different types of sound waves and noise you can generate to calibrate your equipment. For example, we will be choosing the sine wave, which is the simplest of all sound-waves. As I said before, the sine wave will only be generating a pure tone & devoid of harmonics, which is great for this example as we don’t want anything complex to jumble up our kick drum sound.

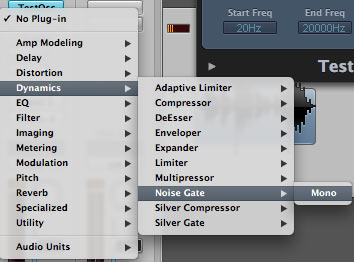
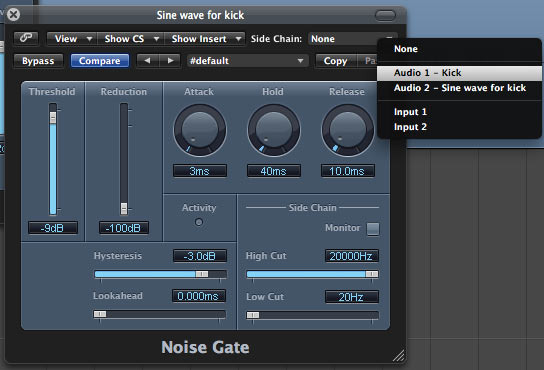
Step 4 – Gate the Sine Wave
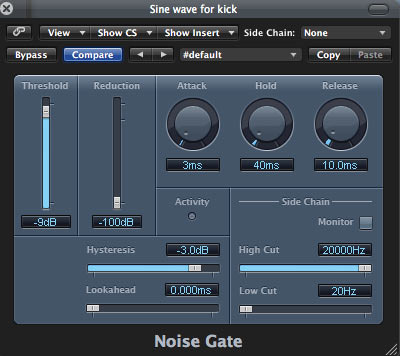
When you’re done listening to the deafening hum of a 50 Hz wave, put a gate on it. Put the gate after the oscillator, and put the threshold on -9 dB to make the gate mute the track. The noise gate is in Dynamics > Noise Gate > Mono on the insert sends. We’ll just make more adjustments on the gate later...
Step 5 – Side-Chain the Gate to the Kick
Now the noise gate should have completely muted the sine wave. Next step is to side-chain the gate to the kick drum, so it opens every time the kick drum plays. Side-chaining is incredibly useful for a lot of applications including; making rhythmic parts, cleaning up badly played bass parts, and so much more.
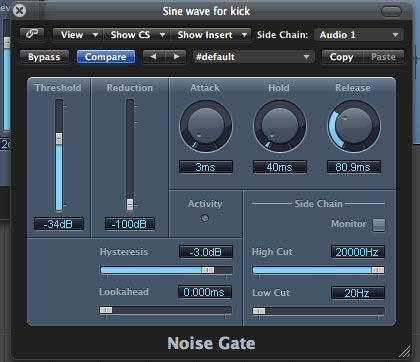
Step 6 – Add Parameters to Taste
Now the only thing left to do is to adjust the threshold and the release so it plays in sync with the kick drum and realistically decays with each hit. I just lowered the threshold until it played in time with the bass drum and then fiddled with the release until it breathed with the drummer’s playing. I tried putting the attack down to zero but that resulted in an undesirable click, so you can also play around with the attack for accentuation.
And that’s it... now you should have a pretty powerful, thumping kick drum that has all the characteristics of a normal acoustic bass drum, but with the added low-end supplied with the generated sine wave. This tutorial uses Logic, but the same idea is applicable to any DAW. Sine Wave generators are included in most DAWS or at least in many soft-synths, so you should have no problem generating one.
Original Source here.