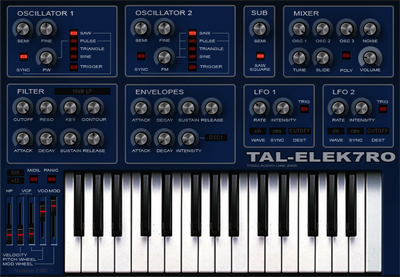
You may be wondering how these things work, right? Synthesizers intrigue many people; all those knobs and buttons can certainly seem very confusing! This basic synthesizer programming tutorial will give you a basic overview of how the common synthesizer works and what important parameters you need to know in order to produce the sounds you want for your productions.
Choosing your synthesizer
I highly recommend that you start by using a simple synthesizer like Reason’s Subtractor or a nice free synth like Togu Audio Line’s TAL-Elek7ro or U-NO-62. Both are what you call “subtractive” synthesizers.
I’m going to be using the TAL-Elek7ro synthesizer for the later tutorial since it is free and available for both PC and Mac.
Basic schematics of subtractive synthesis
There are several ways of synthesizing sounds with machines – Subtractive synthesis (also sometimes called “analogue”) is one of them. Subtractive synthesizers work by producing a harmonically rich sound (a periodically repeated waveform) and then subtracting elements of the sound, actually removing harmonics to achieve the sound you want. I don’t want to get into technical talk, but I will give a short introduction to the various elements of this technique:
Preset tweaking – The essential parameters.
In the following sections we’ll look at the basic sections of a typical synth and their subsections. Once you’re familiar with these basic sections and what they do, you’ll find that just about every synth you come across is familiar in many respects.
———————-
The oscillator:
Waveform This parameter will change the raw oscillator sound that you’re working with. The waveform defines the basic sonic characteristics of the sound. TAL-Elek7ro doesn’t actually have a parameter labeled “waveform”; it has four buttons with different symbols illustrating the waveform.
Semi/Pitch This one is pretty self-explanatory. Try it out.
———————
The filter:
Cutoff The cutoff parameter defines the frequency where harmonics are cut off (duh) the waveform, either above or below. If you’re unsure what his means, try it out, and you’ll notice immediately.
Resonance By raising the resonance, you put additional emphasis on the cutoff frequency, making for some cool filter sweep effects. Also sometimes called “Q” or “Emphasis”.
———————
The amplifier envelope (ADSR):
Attack Defines the time the sound takes to go from no volume to full volume. A big attack value would result in a long “fade in” (think Pad), while a small value would make the sound punch in very quickly.
Decay The time taken for the sound to decay from full volume (when the attack reaches its maximum) to the sustain volume.
Sustain Sustain defines the volume of the sound after the decay – If trying to emulate a flute sound, you would use a high sustain value, while trying to emulate a piano, you would use no sustain.
Release The amount of time taken for the sound to “fade out” when you let go of the note on your keyboard.
——————-
Let’s get designing!
So, now that you have all the synthesizer fundamentals in place, all there is left is to start working with it. The best advice I can give you, is to start by fooling around, trying out all the essential parameters. Then, when you’ve developed a sense of how these things work and how they each affect the sound, try to imagine what kind of sound you would like to make, and imagine what characterizes that sound. Can you emulate the desired sound using the essential parameters? There is no way you can memorize how every cool synthesizer sound is made, so the best thing is to learn how the synth works and make it work for you to produce any sound you want, maybe even a sound nobody has ever heard before!
Tutorial: Creating a synthesized bass
Here’s a short tutorial to help you improve your sound designing skills. We’re going to be making a house bass/lead sound from scratch using the TAL-Elek7ro VST synthesizer. This is what we’re going to be making: House Bass
1. Load up TAL-Elek7ro. If it is not already set, choose the “BS Startup” preset.
2. Let’s start by setting the oscillators. The sound we’re trying to make is made up of 3 oscillators; The fundamental note, the octave below and the major 3rd. To get the rich and fat sound, we’re going to use the saw waveform for all oscillators. Let’s start by turning SYNC off, and turn the sub oscillator (also called “OSC 3”) down a bit:
3. Now, we’re going to turn up the second oscillator. We want this oscillator to play the major 3rd above oscillator 1, to give it that house feel. Adjust the “SEMI” knob until you find the major 3rd (this is 4 semitones up).
4. Let’s move on to the filter. For starters, we have to choose our filter type. Let’s take “BassLine 18 dB” since we’re going to be making a bass sound.
5. The first thing I’ll do is to take down the cutoff value and raise the resonance value. It sounds a bit dull at the moment so we’re going to add some movement using the envelope below. Raise the “CONTOUR” amount, and you’ll begin to notice a difference.
6. Let’s set the filter envelope. At the moment, it is just quick attack, quick decay, full sustain and some release. You shouldn’t actually be able to hear a difference in cutoff movement at the moment, but you’ll notice the sound is brighter when contour is raised. What you’ll want to do is to lower the sustain and raise decay, and you’ll notice the sound is becoming more punchy and percussive.
7. Increase the amplifier envelope release time (we were working with the filter envelope before) and decrease the filter release time and adjust the cutoff until you like the sound.
8. As our final touch, let’s add some velocity control to the cutoff (VCF) to make the sound more expressive. This means, that when we play the notes harder, the cutoff will increase. This may require that you decrease the cutoff.


