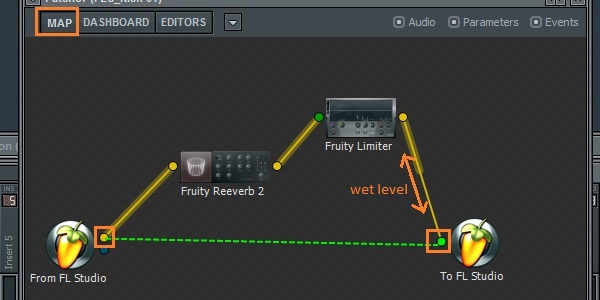
Gated reverb is a fun effect to use on drums, but is usually implemented as a parallel process using a send from one mixer track into another. With Patcher in FL Studio, we can set up a gated reverb as an insert, using only one effect slot and no extra tracks.
Step 1
Route all your drums to one mixer track and open an instance of Patcher in an effect slot in that track. When Patcher pops up, the audio will cease coming through because we have nothing patched in Patcher yet.
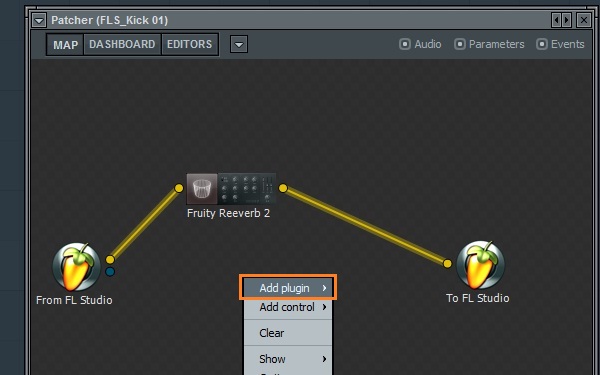
Right-click on the background of the plugin and hover your cursor over ‘Add plugin’ in the menu that appears. From the giant list of plugins that pops up, find and click on ‘Fruity Reverb 2′, which will be on the left side of the list with the other effect plugins. The reverb plugin will be automatically connected to Patcher’s input and output, and we will hear some reverb.
Step 2
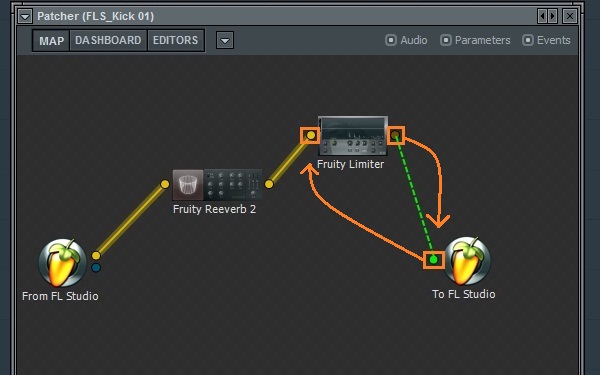
In the exact same way, add an instance of the ‘Fruity Limiter’ plugin. The limiter will not be connected automatically.
Disconnect the reverb from Patcher’s output by clicking and dragging the yellow circle on the left side of Patcher’s output, labeled ‘To FL Studio’. The yellow line coming out of the reverb plugin should follow your cursor. Connect it to the circle on the left side of the ‘Fruity Limiter’ plugin. Connect the output of the limiter to the output of Patcher by dragging another line from the circle on the right of the limiter to the previously disconnected ‘To FL Studio’ circle.
Step 3
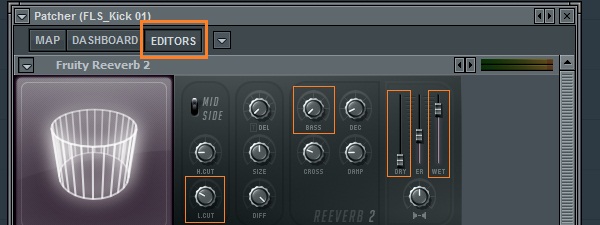
Click the ‘Editors’ tab at the top of Patcher to access the plugins’ controls. First, in the reverb plugin, drag the dry level down to zero and set the wet level to 100%, or more! Adjust the rest of the reverb’s parameters to taste. You could cut out some of the unnecessary low frequencies by turning the ‘L. Cut’ knob up and the ‘Bass’ knob down.
Step 4
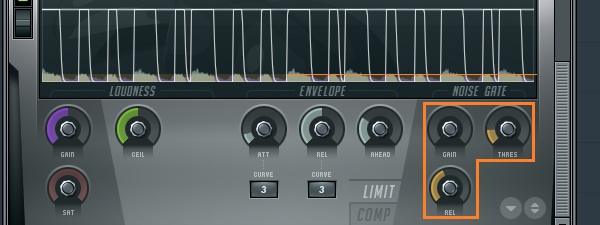
Scroll down to the ‘Fruity Limiter’ plugin. On the right side, there are controls for a noise gate. To enable the gate, turn the ‘Gain’ control down. All the way down is fine. Press play and turn the ‘Threshold’ knob up, watching the small yellow area that appears at the bottom of the scrolling graph. Try to set it somewhere just below the highest points in the waveform, but make sure it sounds right, above all else. Set the ‘Release’ control by ear.
Wet/Dry Mix
You should now be able to hear a bunch of reverb cutting in and out. There are two options for mixing the wet signal in with the dry drum sounds. They both accomplish the same thing, but the second way eliminates some of the latency issues stemming from the limiter.
Option 1
Click on the ‘Map’ tab in Patcher. Draw a connection from the input to Patcher directly across to its output. This is your dry sound. To adjust the level of the reverb, click and drag on the middle of the yellow line connecting the limiter to the output of Patcher.
Option 2
Leave Patcher alone and adjust the mix level knob for the effect slot that Patcher is loaded into. This becomes your wet/dry control, turn it down to hear less of the reverb and more of the drums.
With this method, the latency of the limiter that’s doing the gating doesn’t affect the dry signal. If you would like to hear how the latency changes things, go into the limiter and adjust the ‘Attack’ knob in the limiter section. Turning it all the way down will reduce the latency, but might not sound very good.
Original Source here.

