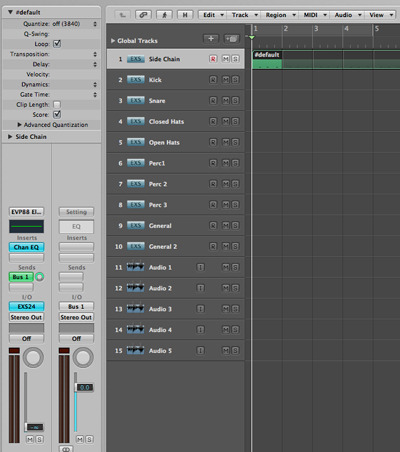
Creating A Template From Scratch – MIDI / Audio Set Up. The first thing to do is open up a new project and start with a blank canvas. As a starting block it is useful to start by creating at least 5 audio tracks, 10 or so MIDI tracks and around 6 – 8 bus channels.
Once these are loaded into the project, the first thing to think about is what you you will generally always use in your productions. One thing is for sure - you will want to be able to EQ every channel. You can do this by inserting an EQ on all the channels, but many people prefer to set up busses for various frequency ranges and send channels to these busses.
How you choose to do this will depend on your prefrence, but also on your processing power – sending multiple tracks out to a few busses with various EQ settings on them means you won’t have to use as many instances of your EQs and will save on processing power. This also helps in giving your tracks some coherence as multiple tracks are set up with very similar EQ settings.
For beginners or those not as experienced with EQ this is probably easier to manage than having a separate EQ for each channel – and it can also be easier to find problem areas if you are only having to tweak 4 or 5 EQs on busses to find the issue. However, this is a matter of preference – the main point is to ensure that whatever way you choose to go you spend a bit of time setting up default settings for you EQs – such as rolling of below 50Hz for example, to save time in future projects.
Audio Channels
As previously mentioned, your template should include a nice selection of audio channels, set up to work with your soundcard’s input and outputs. I generally only use audio channels for effect sweeps and occasionally loops, so a few audio channels suits my needs. However, if you typically use use more audio than MIDI you will want to add more to your template to suit your general needs.
MIDI Channels
When setting up MIDI channels, a good next step is to think about is which instruments you generally use for your key elements - beats and bass.
For example I generally always use Logic’s EXS sampler instrument for all my beats and percussion. So, I would load 8 out of the 10 or so MIDI channels I create with EXS instruments and name them as follows.
- Kick
- Snare / Clap
- Closed Hats
- Open Hats
- Perc 1
- Perc 2
- Perc 3
- Side-chain trigger (kick from EXS instrument)
I would then also load up my “go-to” Bass instrument that I generally use (in my case Arturia’s Minimoog).
Side-chain Set up
Now that you have your beats and bass channels set up, it’s useful to set up a side chain trigger.
To set up a side-chain trigger to create the ducking effect on chosen compressors, I use an EXS instrument that is loaded with a kick, draw in a 4/4 beat and loop this throughout the whole project.
I then change the channel output from post-fader to pre-fader, send the signal to Bus1 and turn the gain on the EXS24 instrument all the way down. I always use bus 1 for my sidechain trigger, so I name that bus channel “Side-chain”. Once you’ve created your side-chain bus, change the output of the “Side-chain” bus to no output (so it is not audible.)
Now, if you want to side-chain any instrument to your beat, just add a compressor with side-chain capabilities to that instrument and and select bus 1 (now named “Side-chain”) for the side-chain trigger. You can change the compressor settings like attack, releases and ratio to suit your taste.
After you’ve done all this, you should have a few MIDI channels that are blank, allowing you to add whatever instruments you want to them during your session, as you see fit.
Master Channel Set Up
I add EQ to the master channel plus 2 different filters (1 low pass and one high pass). I have the filters turned off, so I can turn either of the filters on if I want to filter my track for extra effect - such as the end of the break. It is also a good idea to add a limiter on the master and set this to output 0db (or just below) just so no clipping occurs in the process of making a track. This can be taken off when you come to mix down stage, bringing your levels down ready for mastering.
Working backwards
Working backwards is also a great way of setting up a template.
If you have already done a track with most of the previous examples already set up, such as sampler instruments, audio channels and buss’s then save that project as a different name such as “template” and delete all the parts that are not needed for your standard template. This can sometimes be quicker that having to start from scratch.
More to follow...In part 3 looking at buss channels and how to set these up for common tasks.